1. Installation overview
The installation guide runs through setting up Subversion MultiSite for the first time. If you're already using an earlier version of MultiSite, follow the Upgrade section instead.
Before we begin, here is a recap of the installation process:
- 1.1 Revisit the pre-deployment checklist. Taking extra time making sure you have everything set up and ready may save you from running into problems during the installation process. The main boxes you need to tick are:
- Subversion authenticating: Subversion installed, and using authentication (as set in the Apache config file. MultiSite will only replicate changes to your Subversion repository if authentication is used.
- JDK1.6: You need to have Java JDK 1.6 installed.
- Java Memory Settings: MultiSite will start with 1GB and reserve 2GB of memory when it starts up. Changing the default Java heap size.
- System resources: Ensure that your system is going to operate with a comfortable margin. Hardware Sizing Guide Knowledgebase article.
- 1.2 Have your repository in place at all the servers you plan to replicate. MultiSite can automatically transfer small (less than 1GB) repositories when you add additional MultiSite nodes.
- 1.3 Make sure that Apache is running and the Apache config file as been updated to support MultiSite.
- 1.4 Copy the MultiSite files into place.
- 1.5 Run the setup, then complete the installation from a web browser.
You are going to run the installer at the first node. You don't need to run the installer at any other node, MultiSite will create install packages for other nodes and transfer them automatically.
 Once Subversion MultiSite is installed and you have synchronized repositories, NEVER make a change to your repository that will bypass MultiSite's replicator. This causes the repositories to be out-of-sync.
(Linux/Unix) In order to use port 80, MultiSite must be run as root.
Once Subversion MultiSite is installed, we strongly recommend that you set up the replicator as a service to ensure that it automatically restarts on a system reboot.
2 Starting the installation
2.1 Extract the setup file
2.1.1 Save the svnrep.tar.gz archive to your Installation node.
2.1.2 Extract the setup files using a compression utility that supports the .gz (gzip) format.
Ensure that you install the MultiSite files to a directory called svn-replicator and that you preserve the following subdirectory structure:
| Directory | Contents |
/audit |
Contains the audit trail logs for Access Control. |
/bin |
Contains scripts like svnreplicator and shutdown |
/config |
Contains the svn-replicator/config/prefs.xml file used to configure MultiSite. The license file needs to be place here before you can run MultiSite. |
/lib |
Contains the Java archives (jar) files required to run the MultiSite. |
/logs |
Stores logs and other temporary files. MultiSite's main log file is named SVNProxyServer-prefs.log.0 |
/systemdb |
Contains the system database with its transaction journal. Warning: Deleting or modifying files from systemdb will likely corrupt your installation. |
If using selective replication you need seperate instances of MultiSite installed, but each situated in a directory called svn-replicator, for example:
<replicator01>/svn-replicator
<replicator02>/svn-replicator
<replicator03>/svn-replicator
Selective replication is used when you need to replicate only specific repositories. You can find further information in 1.23 Selective Replication.
2.2 Place your license key
2.2.1 To validate your installation you need to copy the license.key file to the svn-replicator/config directory.
3. Run the setup file
3.1 From the /bin directory, start setup with the following command:
perl setup
Wandisco products use port 6444 by default. If you're not able to use this port on your network, you can set a different port by starting setup using the command:
perl setup <chosen port number>
3.2 Setup will begin by confirming how much memory needs to be allocated to JAVA. By default, MultiSite starts with 1024MB (1GB) whilst reserving 2048MB (2GB).
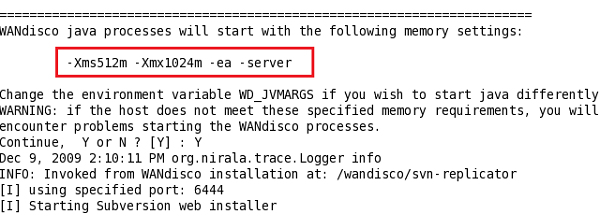
You can change how memory is allocated by editing references to SERVER_JVM_ARGS in the bin/reputils.pm file.
More about Changing the default Java heap size
If you're happy with the allocation, type 'Y' and then press return.
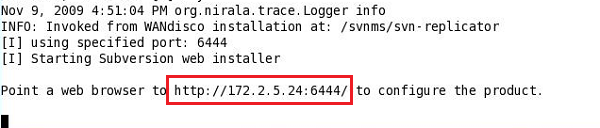
3.3 Setup will now start up the web interface. Open a browser and type in the given address. The default port is 6444. If you entered a different port (step3.1) then use this instead:
http://<server IP>:<6444>
4. Complete setup through a browser
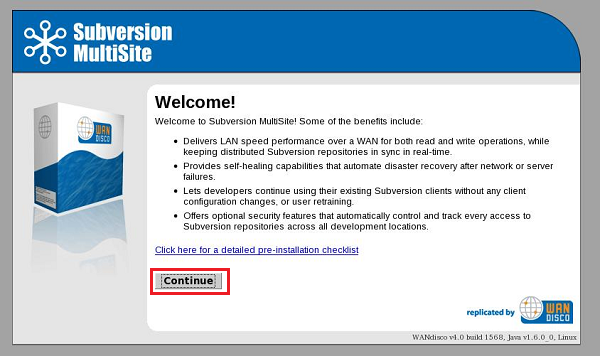
4.1 In your browser you'll see the setup welcome screen. Follow the link to the pre-installation checklist to make a final check that everything is place for a successful installation. When you're ready, click continue.
4.2 Read through the WANdisco End User License, click I Agree to continue.

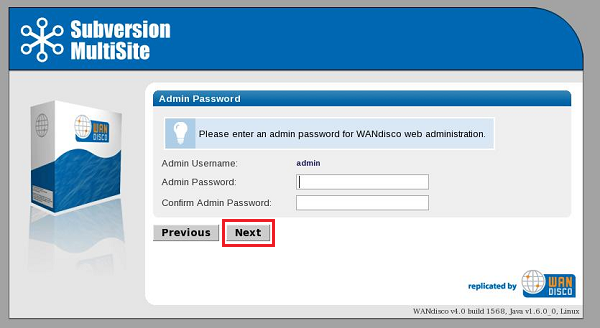
4.3 The default username for getting into Access Control is admin. In the next step you need to enter a password for the admin account. Once you've chosen a password, click Next.
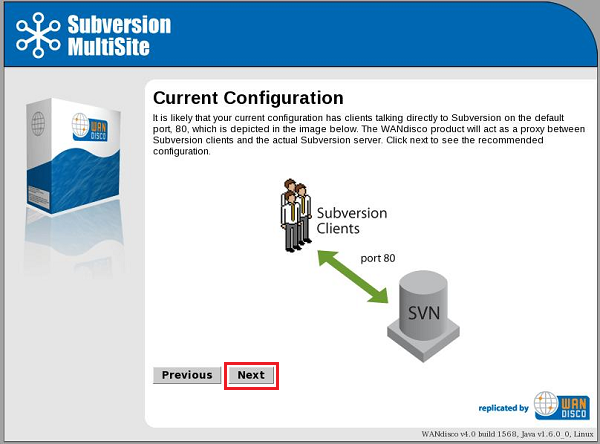
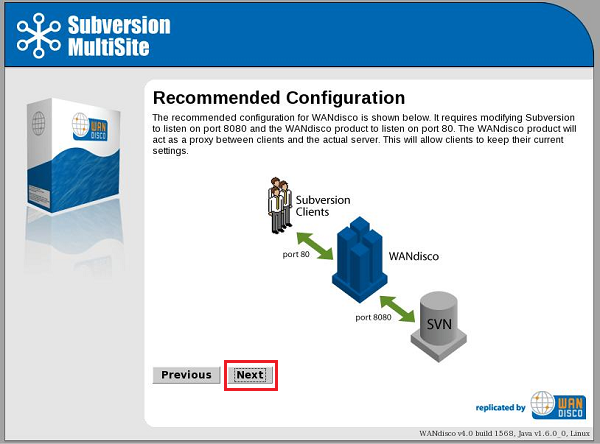
4.4 The next two screens explain how MultiSite will act as a proxy between Subversion clients and the Subversion server. Click Next to continue.
4.5 By default, Access Control will listen on port 80, while Subversion will listen on port 8080. The benefit of this setup is that Subversion end-users don't need to make any changes. Click Next to continue.
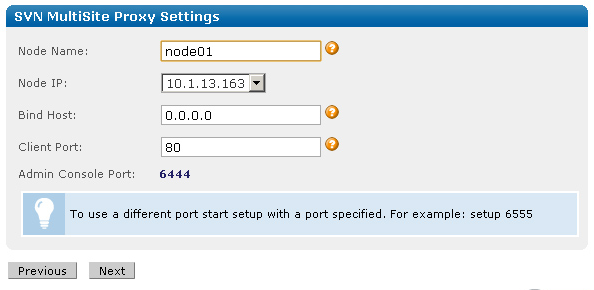
4.6 Next, you'll confirm the proxy settings. These will be populated with the default port settings noted in the previous screens.
Node Name: The name that Access Control will use for sever on which it's installed. The name cannot contain spaces, but can be changed later using the Admin Console.
Node IP: The server's IP.
Bind Host: By default, this uses the wildcard 0.0.0.0 IP that binds to all network interfaces on the node. Read about the benefits of using the wildcard IP
Client Port: By default this is 80, allowing Subversion users to continue without making change to their client setup.
(Linux/Unix) In order to use port 80, MultiSite must be run as root.
Admin Console Port: 6444 by default.
Once you've finished making any changes to the proxy settings, click Next to continue.
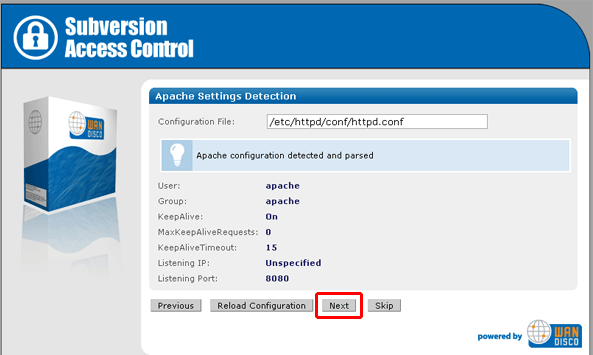
4.7 Setup will now check the Apache config file for settings that might cause problems for MultiSite.
More about Apache configuration changes for MultiSite.
If the httpd.conf file isn't found, enter its path into the Configuration File entry box,
then click Reload Configuration.
Look out for warning boxes for where setup finds a problem - like this one:

If a problem is highlighted, you'll need to manually edit the httpd.conf file, then click on Reload Configuration to have setup check your changes.
User: Owner of the file.
Group: The group in which the owner belongs.
KeepAlive: Setup will look to see that the Keep-Alive directive is set to On.
KeepAliveRequests: Setup will look for 0, which indicates that no maximum limit will be set for connection requests.
KeepAliveTimeout: Set very high (500,000 seconds) to ensure connections don't timeout.
Listening IP: For a node with multiple IPs, this will indicate the IP used for listening.
Listening Port: The default listening port for Apache is 8080.
When you want to continue, click Next. To continue without the Apache config check, click Skip.
4.8 Setup now allows you to modify your Subversion settings. Watch for alerts that confirm the port and path that MultiSite will associate with the Subversion server.
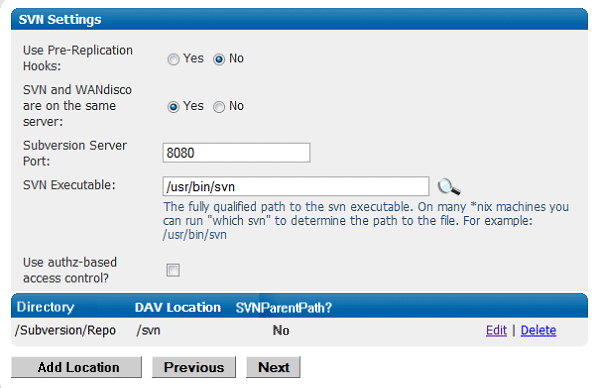
Subversion Server Port: 8080 by default.
Use Pre-Replication Hooks: Select Yes or No.
If you select Yes you must select the version of Subversion installed on your server. If you don't know the version as you run through the setup you can select "Unknown". However, once the installation is completed, you must confirm the version of Subversion you are using, then edit the option from the SVN Settings page.

SVN and WANdisco are on the same server: Select Yes or No. There are benefits to running MultiSite and Subversion on the same server.
SVN Executable:This is the fully qualified path to the Subversion executable. Setup will try to fill this in automatically, otherwise type it into the entry box.
Use authz-based accss control? Tick the box to have MultiSite use Authz authentication.
Use LDAP for authentication Tick the box to use an LDAP service. Provide the URL to your LDAP server.
At the bottom of the screen is a table that confirms the DAV Location and password control for your repositories. You can click Edit to make changes. You can add additional repositories by clicking Add Repository. To continue setup, click Next.
If you click Edit to change Repository you'll be able to edit the following settings:
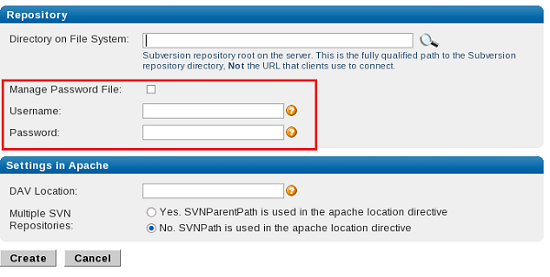
Directory on Files System: This is the fully qualified path to the Subversion repository, not the URL used by clients to connect.
Manage Password File: Tick the box to allow your Subversion password file to be controlled by Access Control. If selected you'll need to provide the username and password of the Subversion user account that will be used by Access Control to browse the repository. The account will need read and write access to the whole repository
Settings in Apache
DAV Location: You can specify the location of the DAV file.
Multiple SVN Repositories: click Yes if you are using SVNParentPath for multiple repositories, or No if using SVNPath.
Click Update to apply your changes, or Cancel to return to the previous screen without making changes.
4.9 You can enter email settings so that MultiSite can send alerts.

SMTP Authentication: If you select No, you'll need to provide your account.
Username and Password in the following entry boxes.
Use SSL/TLS: Choose yes if you wish to send emails over a secure connection.
Host: Enter the address of your mail server.
Port: Enter the SMTP port, 25 by default.
Send Admin Notification To: The email address (You can only specify a single address, not a comma delimited list) to where notifications will be sent.
Email settings are optional. If you don't need alert emails, click Skip to continue. Otherwise, click Next.
4.10. The setup has finished gathering information, You can go back and make changes or click Complete installation with these settings to save them and complete the installation.
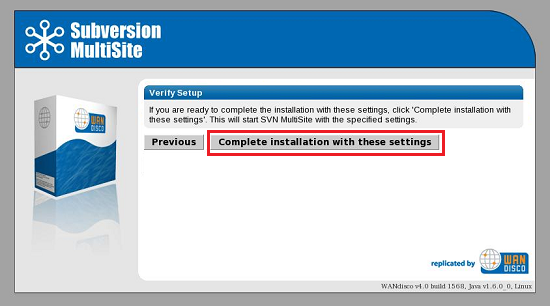
When you click Complete installation MultiSite will start running. You'll be prompted to reload the admin console using an SSL connection.
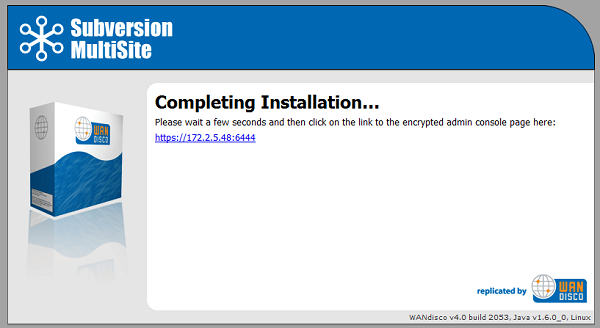
5. Login to the Admin Console for the first time
5.1 The browser will refresh to show the Admin Console login screen.
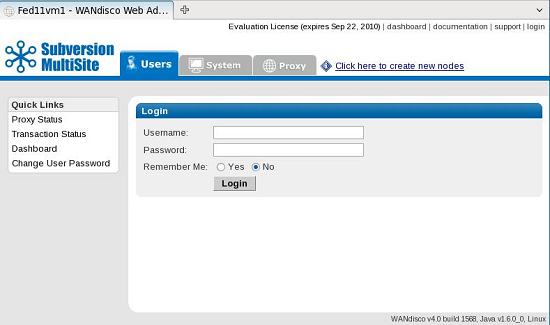
To enter for the first time, the username is admin and the password will whatever you entered during setup (step 4.3).
5.2 When you first enter the Admin Console you'll be prompted to create a new user and other nodes.
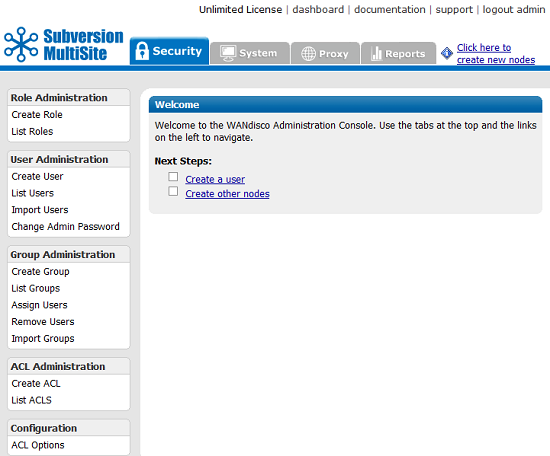
There's a detailed guide to the Admin Console in the User Guide.
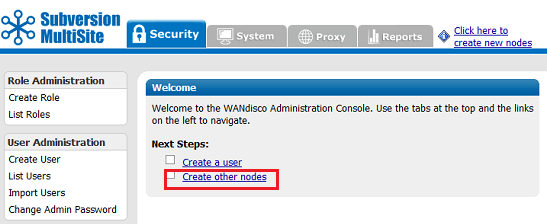
6. Setting up additional nodes
Once you've confirmed that your first node is up and running, it's time to add the nodes at your other sites.
Add additional nodes using the Admin Console. Don't repeat the setup process.
6.1 Click on Click here to create new nodes.
The Node Properties page appears.
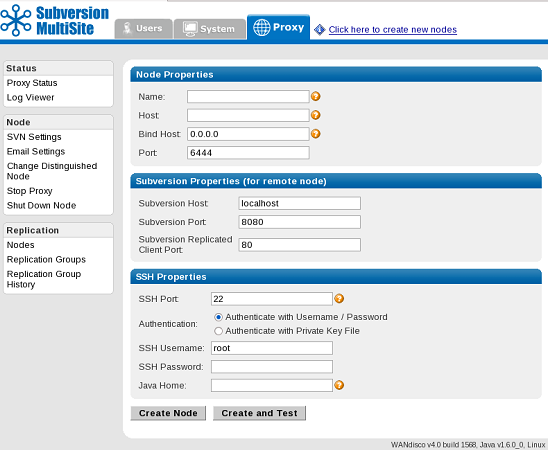
Enter the details of your new node:
Node properties
Name: A name by which MultiSite will refer to the Node
Host Name: DNS name or IP address of the node
Bind Host: The IP bound to MultiSite. We suggest using 0.0.0.0. why we bind to 0.0.0.0.
Port:Port number allocated to the node. The default port is 6444.
Subversion Properties (for remote node)
The Subversion Properties are populated with settings of the first node, which assumes that your new node will use the same proxy setup. Change them if required.
SSH Properties
SSH is used by MultiSite to automatically install on your additional nodes. You enter the details here for giving SSH access to the new node.
SSH Port: Default port for SSH is 22. Assign if a different port if required.
Authentication: By username/password that you provide below, or by Private Key File.
Java Home: The path to JAVA on the new node.
Click Create Node to continue. Click Create and Test to connect to the node and check for JAVA using the details you have provided. If you get an error relating to JAVA, see Installing Java
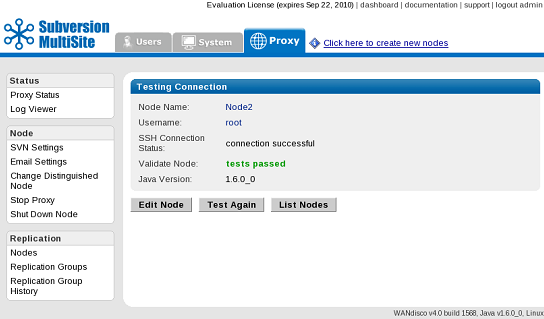
You've set up an additional node. Repeat the process to add more.
Once you've created all your nodes, you need to create a Replication Group.
7. Create a Replication Group
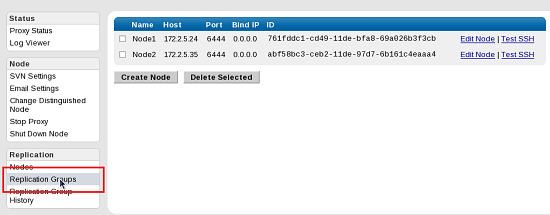
7.1 Click Replication Groups on the side menu.
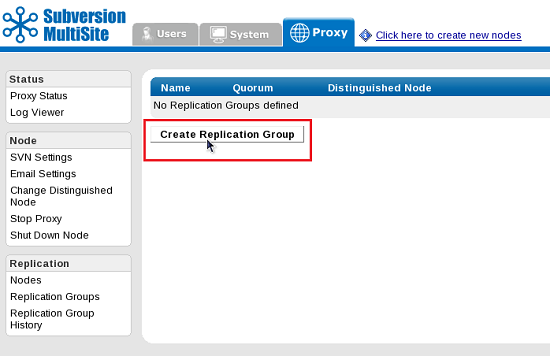
7.2 Click Create Replication Group.
7.3 Enter the details for your Replication Group:
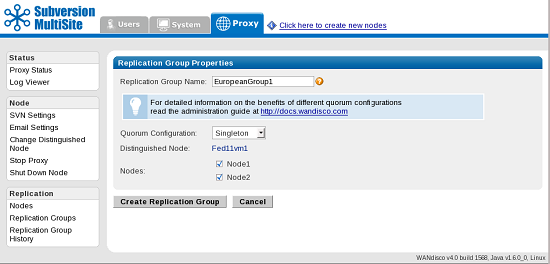
Replication Group Name: A name by which MultiSite will refer to your replication group.
Quorum Configuration: Select a quorum type from the drop-down menu. Before choosing, ensure that you understand the benefits of each type. Quorum Recommendations.
Distinguished Node: If you select a quorum type which uses a distinguished node, it's identified here.
Nodes: You can select which nodes you've created are to be added to the replication group.
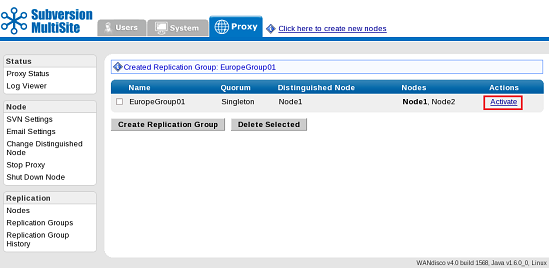
Once you've entered all the details, click Create Replication Group.
7.4 Next, click on Activate.
7.5 Time to decide on how you'll package and put in place the MultiSite and your repositories.
Activation Information
You need to decide if MultiSite will transfer files to the other nodes using SSH, or whether you need to transfer the archive files manually, for instance, you're unable to connect to the other nodes using SSH.
Packaging Options
You can have MultiSite automatically transfer an archive of your repository to the other nodes. There's guidance on this option in the Pre-deployment guide, under Setting up repositories.
If you choose to manually transfer the repository, an archive file will be created for you, which will be saved to the Packaging Directory.
If you change the packaging directory, make sure that it isn't set as a child or parent of the product installation.
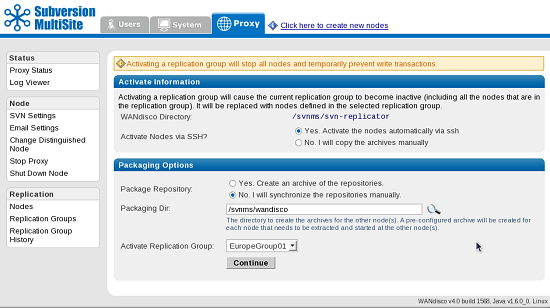
When you've completed the settings, click Continue. If you are dealing with multiple Replication Groups, you can select which group you wish to activate using the Activate Replication Group drop-down.
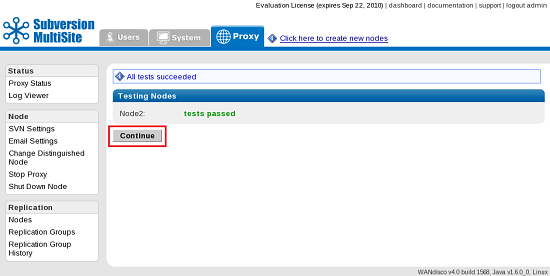
7.6 If you've selected to SSH either the MultiSite files or the repository, MultiSite will check that it can connect to all the nodes. If the test completes successfully, click Continue. If the test fails, check that all your nodes are running SSH, and that there isn't a firewall or network restriction that is blocking SSH.
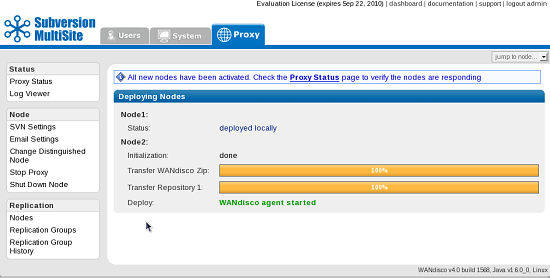
7.7 MultiSite will now transfer its files to the other nodes. You can watch the progress as it runs.
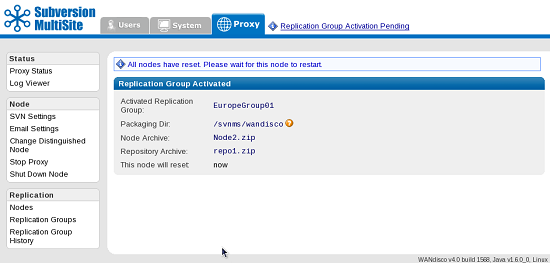
7.8 Click on Deploy Nodes to start up the additional nodes. If you've selected to package your repository, it will be copied across first.
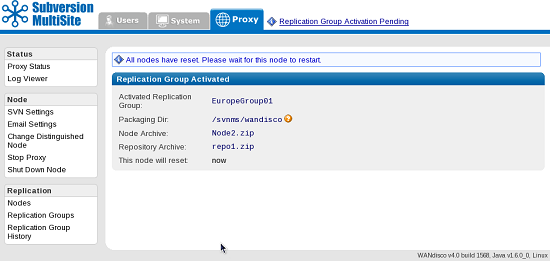
7.9 The transfer is shown using progress bars. If you have singleton quorum and the distinguished node is the local node, you can release the local node to users before the transfer completes. MultiSite will resync the repositories when the other nodes activate.
7.10 When the transfer is complete you can click on the Proxy Status link to confirm that all nodes have started properly.
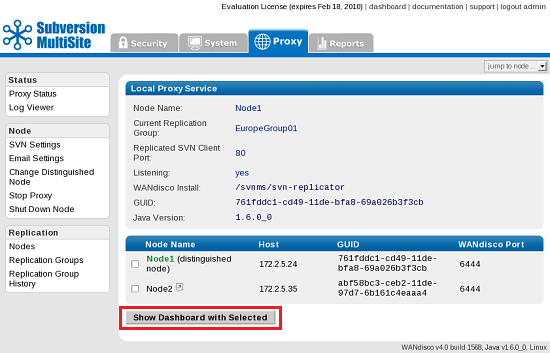
7.11 You can click on the Show Dashboard with Selected to view replicated transactions. It's a good idea to do some Subversion commits in order to verify that replication is working properly.

8. Copying the installation files manually
Follow these instructions if you were unable or chose not to use the automated packaging option Covered in section 7.
MultiSite creates a [node name].zip file for each of the nodes in a replication group. The first node is installed, so perform the following for all new nodes in the group:
8.1 Copy the [node name].zip to the new node
8.2 At the new node, extract the [node name].zip file to a temporary directory called 'wandisco'.
8.3 From a command prompt type:
cd wandisco
perl unpackage
8.4 Follow the directions provided by the unpackage script.
9. Post Installation Configuration
There are some changes you may need to make before starting to use Subversion through MultiSite. These changes are made through the Admin Console, theres a detailed guide to the Admin Console in the User Guide
9.1 Using pre-commit hooks?
If you are going to be using pre-commit hooks, these become WANdisco pre-replication hooks. Read Setting up hooks
in the User Guide.
Copyright © 2010 WANdisco
All Rights Reserved
This product is protected by copyright and distributed under
licenses restricting copying, distribution and decompilation.