1. Procedures
1.1 Disabling Access to Subversion
 This step makes Subversion read-only. You may need to warn your Subversion users.
1.1.1 Temporarily Disabling Subversion Access At Selected Nodes
You can stop transactions at one or more nodes. For a discussion of stopping one, but not all, nodes, see WANdisco is Listening
To stop replication you need to run a synchronized stop.
- 1. Open the Admin Console.
- 2. Select the Proxy tab, click Stop Proxy.
- 3. Select Stop this proxy only.
- 4. Repeat steps 2 and 3 for each node you want to stop.
- 5. To start a node, click Start Proxy. The replication group catches up with the re-started node on any transactions that occurred between the nodes that continued to synchronize.
6. Remember to re-start each node that you stopped.
1.1.2 Temporarily disabling Subversion access at all nodes
To stop all nodes at once, run a synchronized stop.
1.2 Establishing a baseline for replication
Before starting MultiSite, ensure all nodes start with an identical copy of the repository (the svnroots) - identical in all respects, except as noted below.
Depending on the size of your repository and connectivity between nodes, you can decide whether to copy or sync the repository over the network or ship a copy of the repository on a CD, DVD or storage device.
If you already have an older copy of the repository at the remote nodes, for example, if, prior to deploying WANdisco, you were using a master-slave replication solution such as svnup, choose the Synchronize procedure.
1.2.1 Copying the Subversion Database
Otherwise, start by estimating how long it may take you to copy the repository over the network by determining the size of your repository and the bandwidth available to the remote nodes. If you conclude that it takes too long, you will want to ship the repository to the remote nodes on a physical medium.
1. Determine the size of the repository. From a Unix command prompt, cd to your repository and type:
du -s
This reports the size of your repository in kilobytes.
2. Determine the network capacity by copying a test file (50-100MB) between nodes, timing how long it takes.
3. You can use the time your test transfer took to transfer to estimate how long it will take to copy your repository between nodes.
1.2.2 Synchronizing with an older remote copy
You can use rsync to synchronize your master with and older remote copy. For example, from the machine with the master repository, type:
rsync -rvlHtogpc /svn/repo <user>@<target node>:/svn/repo/
Note that the final element, <Repository Name> is not specified in the remotehost's path.
You then need to complete an additional sync to ensure that the state of locked files will match up:
rsync -rvlHtogpc --delete /svn/repo/db/locks <user>@<target node>:/svn/repo/db/
This will delete locks that exist in the target repository that don't exist on the source repository.
For further information, see the rsync man pages.
1.2.3 Copying Over the Network
Use this procedure if;
- You do not have an older remote copy; i.e., you are copying the entire repository over
- Your repository is small enough
- You have enough network bandwidth to copy the repository to the remote nodes in reasonable time.
- 1. Ensure that the repository is not in use. If necessary, shut down the Subversion server. For example, type:
/etc/init.d/xinetd stop
cd <file path>
tar pzcf myRepository.tgz myRepository
ssh remoteHost mkdir -p <file path>
scp myRepository.tgz remoteHost:<file path>
cd <file path>
tar pzxf myRepository.tgz
1.2.4 Sending repositories on physical media
If copying over the network will take too long, you can ship the repository to the remote destination on a disk or storage device. This way you don't need to wait for the baseline to be available at all nodes before using MultiSite. Instead, use the following procedure:
Using WANdisco before the baseline is available at all nodes
- 1. Deploy WANdisco as usual, but do not start the WANdisco server at the nodes where the baseline is not yet available.
- 2. When choosing a quorum, ensure that the nodes where WANdisco can be started are sufficient to form a quorum. The simplest way to do this is to choose the Singleton Quorum policy, and choose the node that has the master copy of the repository as the distinguished node.
Safe Differences
The only things that can safely differ in the baselines across your nodes are post-commit triggers. For example, if you generate email notifications from a post-commit trigger, it is a good idea to do that at only one node to avoid generating duplicate email notifications.
Common Pitfalls
It is important that the repositories are identical in all respects except as noted above.
A common mistake when the desired baseline is an empty repository is to init a new empty repository at each node. Instead, you should init the repository at one node, and copy the empty repository to other nodes.
Subversion repositories incorporate a GUID (Globally Unique Identifier) that is generated at the time of the init. This needs to be GUID identical at all nodes. The best way to ensure this is to copy the repository from one node to the others.
1.3 Finding the Last Committed Transaction
Even though committed transactions are always in the same order for each node, the timing of the commits usually varies from node to node. So unless there are no Subversion users logged in, you probably are going to have variations per node for committed transactions.
Go to any node's Dashboard. Type:
http://<IP address>:<WANdisco port number>/dashboard2
You see all the nodes on the Dashboard to compare the listed transactions.
1.4 Adding a repository to a replication group
Use this procedure to add a repository to an existing replication group.
- 1. Ensure that all nodes in the replication group have an exact copy of the repository ready to add. (assuming repository has already been copied to all nodes.)
-
2. Add the repository to the Apache configuration files, being consistent with the existing method. You should be using either
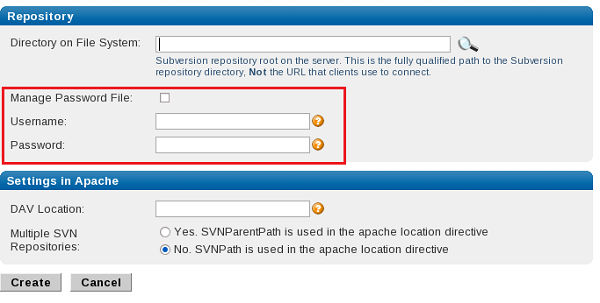
SVNParentPathorSVNPath. For more information, see Using two or more repositories - 3. Specify the new repository for MultiSite. In the Admin Console, click on the Proxy tab and select SVN Settings from the side menu. The repository details will appear.
- (a) Browse to the repository root.
- (b) If you want MultiSite to manage the password file, check the Manage Password File checkbox and provide the path to the password file's location.
- (c) Enter a username and password for read access for the entire repository.
- (d) Enter the repository's
DAVlocation. - (e) Answer Yes or No if you are using multi root Subversion (really, MultiSite wants to know whether you are using
SVNParentPathorSVNPath). - 4. Click Create.
- 5. Perform a consistency check. See Checking Repository Consistency.
- 6. Verify clients can see the new repository. Log in as a client and check out a file from the new repository.
- 7. Notify users they can begin using the new repository.
1.5 Removing a Repository from the Replication Group
- 1.Perform a synchronized stop of the replication group.
- (a) Go to the Proxy tab on the Admin Console. On the left menu, click on Stop Proxy.
- (b) Check Synchronized stop of all proxies. All nodes stop. Pending transactions get completed, but WANdisco accepts no further client transactions. The Subversion servers go into read-only mode.
- 2. At all nodes in the replication group, delete the entry for the repository in the Apache configuration files, being consistent in repository specification. If you are using
SVNParentPath, use that method. If you are using the Location directive, specify that. - 3. Update MultiSite to reflect the change. Go to the Proxy tab, and select SVN Settings. In the Repository section, click Delete. The change will be replicated throughout the group.
- 4. Restart the replication group. Go to the Proxy tab and select the Proxy Status command. Click Resume.
- 5. Verify clients can no longer see the repository. Log in as a client and verify that the repository is unavailable.
- 6. Notify users they can no longer use the old repository.
- 7. The repository is still in its same physical location.
A synchronized stop completes only when all nodes are available. If one or more nodes are unavailable, the process suspends until they are available.
This step makes Subversion read-only. Please follow your company guidelines on notifying Subversion users of maintenance.


1.6 Moving a Repository to another replication group
- 1. Remove the repository from the first replication group. See Removing a Repository from the Replication Group.
- 2. Add the repository to the second replication group. See Adding a Repository to a Replication Group.
1.7 Adding a Node to the Replication Group
To add a node to an existing replication group, you have to create a new replication group that contains the new node and then activate the new replication group. See Creating a New Replication Group.
Determine a plan for copying the repository to the new node. See Setting up identical repositories at all nodes.
- 1. Go to the Proxy tab, Click Nodes on the left.
- 2. Click Create Node.
- 3. Fill in the fields on the Node Properties form.
- 4. Create a new replication group containing the new node. See Creating a New Replication Group
The new replication group is activated with all nodes.
1.8 Removing a Node from the Replication Group
Only one replication group is active at a time.
You cannot delete a node from an active replication group. To delete a node that is part of a replication group, you must create a new replication group that excludes the node to be deleted, activate that new replication group, and then delete the node. See Creating a New Replication Group.
1.9 Creating a New Replication Group
If the new replication group contains new nodes, you must contact WANdisco support (in the US at 877-207-1439, internationally at +1-925- 218-2300) to request a new license file.
1.9.1 Considerations
- Only one replication group is active at a time.
- If possible, create a replication group from the node that is to be the distinguished node in the new replication group.
- If you have a current replication group, then you must first create another replication group, and then activate it. You cannot delete the current replication group.
1.9.2 Considerations for Majority Quorum
If your current replication group is set to majority quorum, and you want an additional, larger group, also with majority quorum, you'd follow the following procedure.
This is only for when a new group outvotes the current majority. If you had one or two nodes to a two node group, the original two nodes can still form a majority, so the standard procedure still works.
By using this majority quorum-to-larger majority quorum method, MultiSite ensures quorum integrity and protects against unnecessary down time. The new nodes can take a while to come online, depending on WAN connectivity. Organise the transfer of your repositories before beginning the process to avoid having the original replication group limited to read-only while waiting for the new nodes to come up and form a majority quorum.
Follow these steps to successfully create and activate a new replication group (generic instructions for creating a replication group follow in the next section):
- Create a new replication group with all the nodes, but with singleton quorum and the distinguished node is the node you are working from.
- Activate the new replication group.
- Create another replication group that contains all five nodes, but has majority quorum. You can select the desired distinguished node.
- Activate the new replication group.
All nodes are up and running.
1.9.3 Procedure
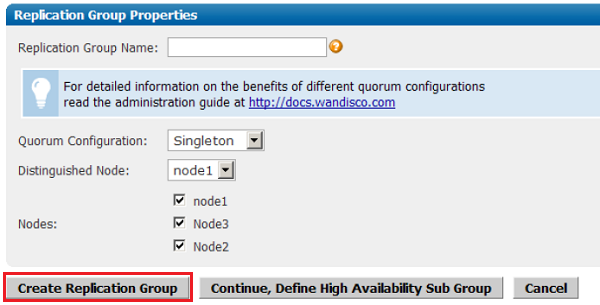
- 1. Create any new nodes, if necessary. If a node has been previously defined, it is listed in the Nodes section of the Proxy tab. To create a node, click Create Node. Enter all required information for the site.
- 2. If you obtained a new license key, place it in this node's current
svn-replicator/config directory. - 3. Create the Replication Group. On the Proxy tab, click Replication Groups. All previously defined replication groups are listed, including the current one.
- 4. Click Create Replication Group.
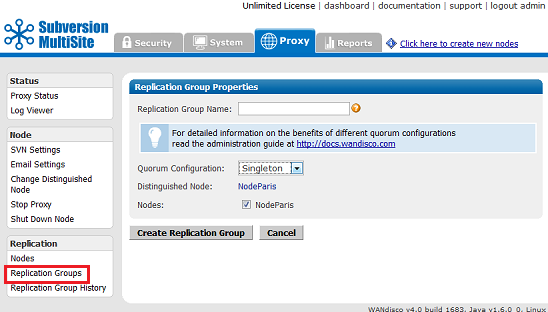
- 5. Name the replication group, and select the appropriate quorum. See more about quorum selection.
- 6. Select the nodes that will form the replication group.
- 7. Click Create Replication Group.
- 8. Click Activate Replication Group.
- 9. Select the desired activation options.
- 10. Verify that the Activate Information is accurate.
- 11. Specify whether MultiSite will package the repository, or you are copying it manually.
- 12. If you want to change the packaging directory from the default, do so in the Packaging Dir field.
- 13. Verify that the displayed replication group (in the Activate Replication Group field) is the one you want to activate.
- 14. Click Continue. The status displays, and then the replication group displays. Note that only the first node is activated at this time.
- 15. Activate the other nodes by clicking Activate Node(s).
1.10 Deleting a Replication Group
Use this procedure when you want to delete a replication group. If the replication group you want to delete is the current one, you must first activate another replication group (if it does not already exist, you must create one), and then delete the desired replication group. Note that you can create a replication group with just one node.
Only one replication group is active at a time.
To delete a replication group that is not active, go to Replication Groups on the Proxy tab. Check the box next to the desired replication group, and click Delete Selected. The replication group is deleted.
To delete a replication group that is active, create another replication group, activate it, and then delete the desired replication group. See Creating a New Replication Group.
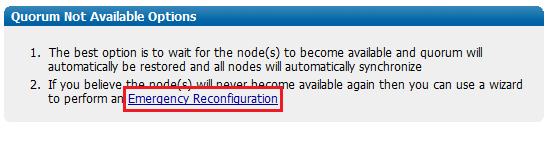
1.11 Emergency Reconfiguration of Quorum
Use this procedure as a last resort, if the distinguished node (in a singleton quorum) has become permanently unavailable. The procedure basically creates a new replication group that excludes the unreachable node.
Do not use this procedure for a High Availability sub group.
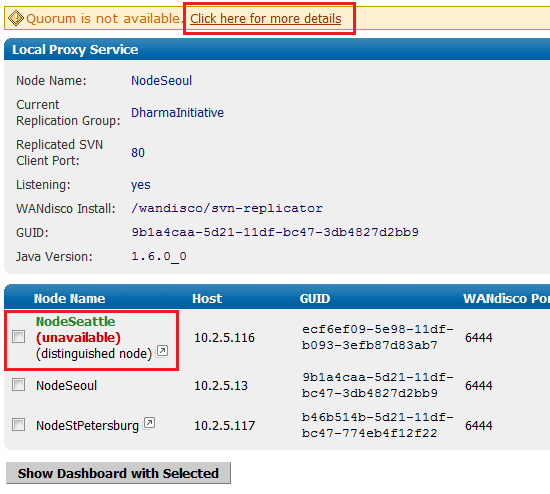
If a quorum can't be formed, an alert will appear at the top of the admin console.
Follow the "Click here for more details" link.
Use the emergency reconfiguration procedure only when the recovery of the distinguished node will take an unacceptable amount of time.
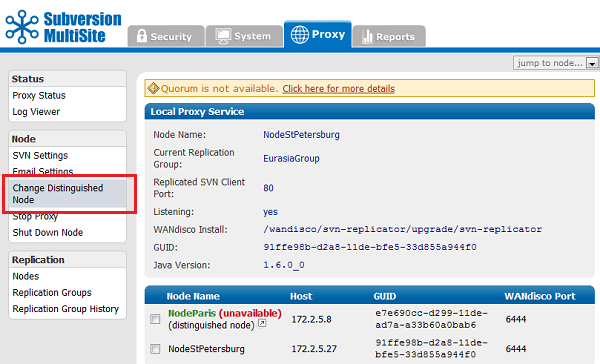
Using a Singleton Quorum - If the distinguished node is periodically reachable, instead, try using the Change Distinguished Node while its available.
Using a Majority Quorum - If the quorum is periodically reachable, instead, wait for the quorum to become available and recreate the replication group, using a singleton quorum, instead of using the emergency procedure. You can change back to the majority quorum after stabilising your nodes.
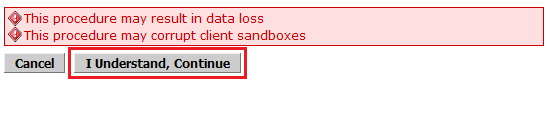
WARNING:
We don't recommend using this procedure because of the potential for data loss. If the distinguished node is unreachable by other nodes it could still be processing transactions on its own (with singleton quorum, the distinguished node can operate alone). Therefore, if the other nodes form a new quorum that excludes the distinguished node, any transactions made at the distinguished node since it became unreachable to the other nodes would be lost.
- 1. Ensure Subversion users at the Nodes which will not be in the new replication group, after the emergency quorum reconfiguration are notified that they won't be able to make changes to any repositories.
- 2. It's essential that the unreachable distinguished node is properly shutdown and has had a reset performed. The emergency quorum reconfiguration can't be completed (specifically a new Replication Group can't be created) if the distinguished node is brought back up during the procedure.
- 3. Be prepared to manually start any Nodes, you may be directed to do so during the procedure.
- 4. Read the message. If you decide to continue, click "Emergency Configuration".
- 5. Read another warning message about the possible data loss that can occur. It may be better to make another attempt to recover the distinguished node, otherwise click "I Understand, continue".
- 6. Tick the checkboxes next to the nodes to be added to the new replication group.
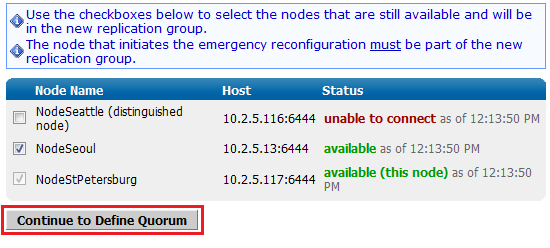
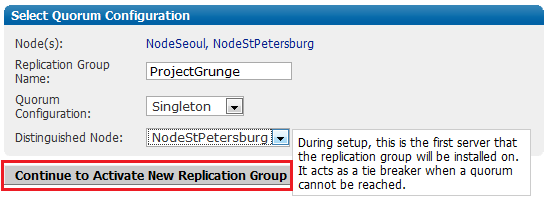
- 7. Name the new replication group, and click "Continue to Define Quorum".
- 8. When all the nodes are reset, click "Continue".
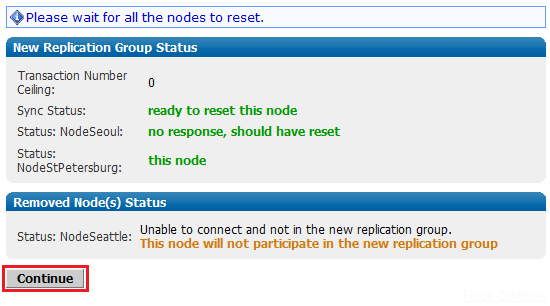
- 9. Verify that the systemdb has been deleted at the other nodes (other than the one you're on now), and click "Restart and Join New Replication Group".
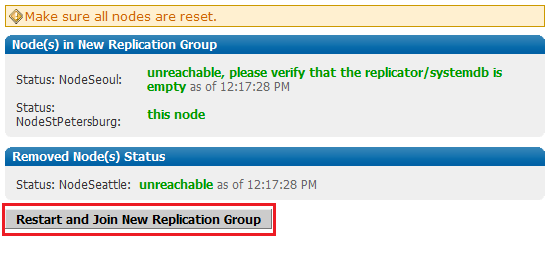
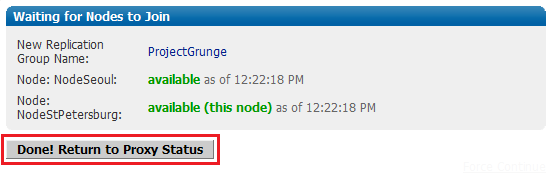
- 10. After a few moments, you see that all nodes confirm that they have joined the new replication group. The repositories hosted on these nodes will be in synch. Click "Done! Return to Proxy Status".
- 11. The Emergency Reconfiguration is now complete. Nodes that have been removed from the replication group can be restored and reintroduced using the same procedure that is used for adding brand new nodes - 1.7 Adding a Node to the Replication Group You may wish to clean up the retired node and replication group.
There's currently a bug that prevents the deletion of the first (installation) node from the previous replication group. There's a workaround available in our Knowledgebase - Deleting the First Created Node in Subversion MultiSite 3.7
1.12 Changing a prefs.xml File
The prefs.xml files for nodes are located in svn-replicator/config. Each file contains all preference information for the nodes in the group.
If you make changes that affect more than one node, you must change each node's specific file. If your change only effects just one node, you can change just that node's prefs.xml file.
1.12.1 Changing One Node's prefs.xml File
1. Shut down the node or nodes where you changed the prefs.xml file. Go to the Proxy tab and click Shut Down Node.
2. Make the desired changes to one or more prefs.xml file.
3. Restart the node or nodes you stopped. At the command line, type
perl svnreplicator
The changes you made in the prefs.xml file are now in effect.
1.12.2 Changing All Nodes' prefs.xml Files
- 1. Perform a synchronized stop. See Performing a Synchronized Stop. That procedure includes resuming MultiSite.
- 2. Make the desired changes to each node's prefs.xml file.
- 3. Restart WANdisco at all servers. Click Resume.
1.13 Performing a Synchronized Stop
A synchronized stop completes only when all nodes are available. If one or more nodes are unavailable, the process suspends until they are available.
This procedure makes Subversion read-only. You'll need to warn your Subversion users of some down-time.
- 1. Go to the Proxy tab on the Admin Console. On the side menu click Stop Proxy.
- 2. Check the Synchronized stop of all proxies radio button. All nodes stop listening. Pending transactions get completed, but MultiSite accepts no further client transactions. The Subversion servers go into read-only mode.
- 3. Restart MultiSite at all the nodes. Refresh the Proxy tab and click Resume.
The page refreshes, and you can see the Listening field now shows yes.
1.14 Verifying That the replicator is working
The quickest way to check replication is to add a new user through the Admin Console of one of your nodes. Then, jump to another node and confirm that new user has appears there too.
Another way to check replication is to verify there are commit transactions posted to the log file svn-replicator/logs/SVNProxyServer-prefs0.log. More about log files
1.15 Installing an updated .jar File
- 1. Download the
svn-replicator.jarfile. - 2. Verify the md5 checksum. Type
Follow these steps to copy over an updated svn-replicator.jar file to an existing Subversion MultiSite installation. You are going to copy the same jar file to each node's lib directory.
md5sum <filename>
/lib directories are in the WANdisco CLASS path.)lib directory.1.16 Changing the Distinguished Node
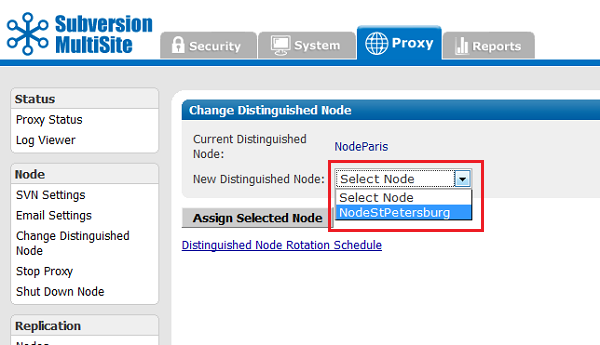
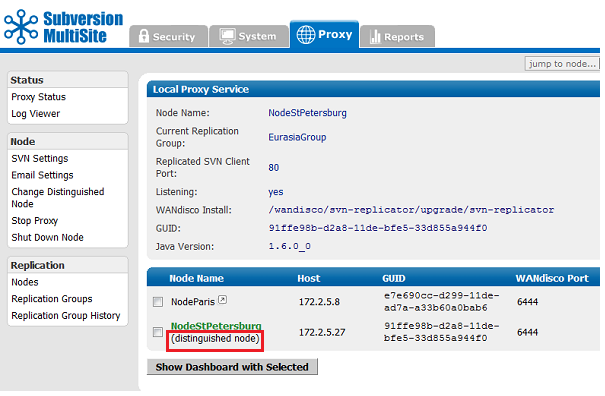
- 1. To change the Distinguished Node, go to the Proxy tab on the Admin Console.
- 2. Click on Change Distinguished Node command on the left side menu.
- 3. Select the desired node from the New Distinguishing Node drop down list.
- 4.Click Assign Selected Node. The transaction may take a few moments to take effect. Refresh the page to see the change.
If there is a distinguished node rotation schedule set up for this replication group, WANdisco changes the distinguished node according to the schedule, so any change using this Change Distinguished Node command is a temporary change.
1.17 Using Subversion triggers for sending e-mails
Many administrators like to set up Subversion backend triggers that fire whenever a Subversion user commits a set of file changes. With a master/slave Subversion server setup, e-mails can be initiated once when the post-commit trigger fires.
However, with the addition of MultiSite, unless some safeguards are put in place, all your Subversion replicas may fire the post-commit trigger. This could cause duplicated e-mail notifications.
The easiest way to remedy this is to designate any one node as the "e-mail hub". Just enable the post-commit trigger to fire from a single node within the replication group. Alternatively, you could use the time of day to fire the e-mail alerts from a specific node. For example, you could modify the post-commit trigger to send e-mails from India during 9:00 a.m. to 5:00 p.m. IST, and from the US during 9:00 a.m. to 5:00 p.m. PST.
It is possible to have asymmetry in the e-mail triggers, but make sure not to disable the pre-commit trigger on any node. That may cause a Subversion commit transaction to abort at some nodes but commit at other nodes. The pre-commit trigger behavior at each node should be deterministic and should not cause the replicas to go out of sync.
When sending e-mail, it is important to set up the e-mail configuration to avoid long blockages or delays. Many times, an administrator uses the default SMTP settings on the Subversion host.
These settings by default try to use the organization domain specific e-mail server to send e-mails (by looking up the MX records corresponding to the organization's domain).
The organization-wide SMTP server may be located on a remote WAN, or it may have throttling policies for e-mails originating from the same IP address to cut down on spam. This can cause it to block or reject e-mails, which may in turn cause scripts (like the post-commit script) to hang or terminate. To avoid such problems with e-mail triggers, WANdisco recommends that you set up a local e-mail hub or a local SMTP agent/server. The local SMTP server should preferably be on the same host as the Subversion server. It should be set up to forward/relay e-mails to the organization-wide SMTP server. This ensures the e-mail triggers are a lot faster and just need to enqueue the e-mails to the local SMTP server.
1.18 Toggling the Quorum Check
The replicator, by default, verifies if a network quorum is reachable when a write command is submitted. If the quorum is unreachable, by default, the write command is aborted and the following message appears on the Subversion client console:
Check the Network connectivity, failed to reach a
minimum quorum of nodes. Aborting the svn write operation.
The quourum check is toggled on or off using the Auto Skip bypassable transactions checkbox, found in the System Settings page of the admin console. See 5.5.2 System Settings.
Prior to version 3.7 Build:3517, this function was controlled from the prefs.xml file using the <AlwaysVerifyQuorum> element.
From 3.7 Build 3517 this prefs file element will no longer work. If you had previously set the <AlwaysVerifyQuorum> as true, you will need to appy the setting via the admin console, as per 5.5.2 System Settings.
If the check is turned off and quorum is un-reachable, the write transaction will be applied to the WANdisco Subversion replicator's transaction journal and stay in a pending state till network connectivity and quorum is restored. Note: With singleton quorum, if the current node is also the distinguished node, the quorum check will always succeed irrespective of network connectivity to other nodes.
1.19 Changing the admin username
The default login username for the Admin Console is admin, and the password is user-defined during installation. That way, all nodes initially have the same login and password.
You can change the login for any node. Each node can have its own login, however if you do change it, ensure that all node administrators throughout all nodes know it. If four nodes each had their own logins, then each administrator would see the other nodes in the Dashboard, and could not access the other nodes' Admin Consoles without entering those nodes' passwords.
You can have different logins and passwords for different nodes, however we recommends you keep administration simple, and have the same login and password for all nodes.
To change the login at a particular node, enter the following in prefs.xml.
<Security>
<Admin>
<user>newlogin</user>
</Admin>
</Security>
See Changing a prefs.xml File.
1.20 Changing the admin Password
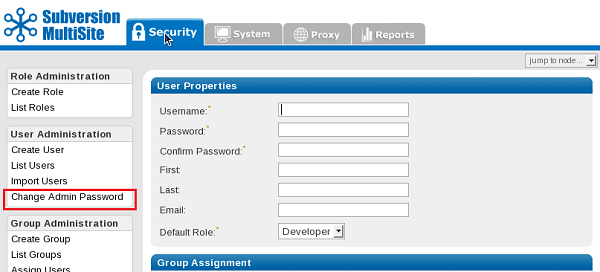
On the Security tab click Change Admin Password on the menu (under User Administration).
This changes the password for this node only. The password does not get replicated.
Ensure that all node administrators throughout the replication group know the new password.
1.21 Resetting or Recovering the Admin Console Password
The password is user-defined during installation. If you change the password from the Admin Console, that change affects only the current site. The password change is not replicated.
Once a site's password is changed, the new password's md5-hash is securely stored under the /config/passwd directory. This directory does not exists initially, and gets created when the password is first changed.
Since MultiSite never stores the actual password, if you loose the changed password, there is no way to recover it. However, you can reset the password using one of two techniques:
1.21.1 Restore the admin console password
- 1. Compress the
/config/passwddirectory at a node where you know the password. - 2. Copy and uncompress the file from the previous step into current node's (lost password)
/configdirectory. You are over-writing the existingconfig/passwddirectory.
1.21.2 Reset the admin console password as "wandisco"
- 1. Delete the
/config/passwddirectory at the current site. - 2. Restart MultiSite at the current site.
- 3. Login using the password wandisco and immediately change the password to something more secure.
1.22 Setting Up Hooks
See the following table for how to integrate Subversion hooks with MultiSite.
| Hook | How to Integrate with WANdisco |
| start-commit | Standard Subversion implementation. Must be present at all nodes, and must either execute identically at all nodes or fail identically at all nodes. |
| pre-commit | This becomes the pre-replication hook. See the following sub-section. |
| post-commit | Standard Subversion implementation. Must be present at only one node. |
| pre-revprop-change | Standard Subversion implementation. Must be present at all nodes, and must either execute identically at all nodes or fail identically at all nodes. |
| post-revprop-change | Standard Subversion implementation. Must be present at only one node. |
1.22.1 Pre-Replication Hook
To use pre-replication hooks, make sure you tell WANdisco what version of Subversion you are using. Go to the Proxy tab, select SVN Settings, and specify the Subversion Server Version. See Subversion Server Version in Using the Admin Console.
The SVN DAV pre-commit hook becomes the pre-replication hook. Subversion does not execute it: WANdisco invokes this hook before forming a proposal.
Per the SVN DAV specification, if the hook succeeds, nothing is communicated back to the client. The handling of the command proceeds normally.
If the hook fails, per the SVN DAV specification, stderr is packaged as an XML response to the client. In response, the client typically deletes the activity; i.e., cleans up the temporary files, etc., on the server side.
1.22.1.1 Configuration
Modify your prefs.xml file at all nodes to contain the following tags. See Changing a prefs.xml File. Below is a sample configuration of a pre-commit pre-replication hook.
Make sure the hook is not installed in the repository's hooks directory, since you don't want the SVN server to find it.
<Hooks>
 <enabled>true</enabled>
  <list>
    <hook name="pre-commit">
     <command>C:/cygwin/home/user/bin/pre-commit.bat</command>
     <captureExitCode>true</captureExitCode>
    </hook>
  </list>
</Hooks>
1.22.1.2 Repository-Specific Hooks
If you want different hooks to act on different repositories, you can do so. Create a script (for example, pre-replication.sh or .bat) that contains a case statement that calls each repository-specific hook by passing the repository name as a parameter. Change the prefs.xml to point to that script.
<Hooks>
 <enabled>true</enabled>
  <list>
    <hook name="pre-commit">
     <command>C:/cygwin/home/user/bin/pre-replication.bat</command>
     <captureExitCode>true</captureExitCode>
    </hook>
  </list>
</Hooks>
1.23 Selective Replication
By default, MultiSite replicates all SVNROOTS associated with a Subversion repository. However, you can specify a set of SVNROOTS that you do not want to replicate. Use Excludes for SVNROOTS in the prefs.xml file to identify the repositories you do not wish to have replicated. For example:
<SVNProxy>
....
<ExcludeRepositories>/exclude,/dir0</ExcludeRepositories>
....
</SVNProxy>
If MultiSite can't find the entry, it's included in the replication. There are no wild (regular) expressions. For Apache and SVNPath, the syntax must match what is listed in the Location directive. For Apache and SVNParentPath, the syntax must match what is listed in the Location directive and Path to the repository.
All the included roots go through the same agreement manager. For example, say you have three repositories.
/repos/rep1

/repos/rep2

/repos/rep3
For SVNPath, the Location directive is
<Location/rep1>
  SVNPath /repos/rep1
</Location/rep1>

<Location/rep2>
  SVNPath /repos/rep2
</Location/rep2>

<Location/rep3>
  SVNPath /repos/rep3
</Location/rep3>
For SVNParentPath, the Location directive is
<Location/repository>
  SVNParentPath /repos
</Location/repository>
To exclude the first repository, rep1, for SVNPath, you would exclude rep1: for SVNParentPath, you would exclude /repository/rep1.
You must name a repository after the / character. Subversion does not support a location named with just the / character.
1.24 Updating Apache or Subversion in WANdisco Deployment
This procedure requires that your MultiSite deployment, including Subversion servers, are off-line during the time it takes to upgrade at each node. Please plan this procedure accordingly.
- 1. Ensure MultiSite supports the version you want to upgrade to. Check on the pre-deployment checklist.
- 2. Test the new version of Apache or Subversion in a test environment.
- 3. Once you are ready to deploy the new version in your production environment, perform a synchronized stop. See Performing a Synchronized Stop.
- 4. Update each of the nodes.
- 5. Resume MultiSite.
- 6. Perform some tests at each node to confirm the update has completed successfully
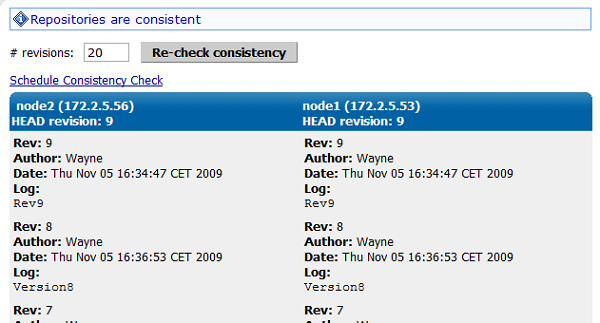
1.25 Checking Repository Consistency
MultiSite provides a command that checks for consistency in a replication group's repository. You can perform as required or set it up to run on a schedule. We recommend setting it up to run daily. The results are sent to the administrator via email.
To set up a consistency check:
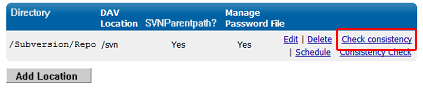
- 1. Go to Proxy tab, click on SVN Settings.
- 2. Click Check Consistency.
3. Read the consistency report. A partial example follows.
Scheduled Consistency Check
As part of your system monitoring strategy, you can set the Consistency Check to automatically run on a schedule.
Important! If you discover a problem with repositories being out of sync, immediately cancel any scheduled consistency checks. If a consistency check is run while repositories are out of sync, the agreement required to complete the check may not complete, resulting in the stalling of affected nodes.
2 Replicator Management
2.1 Setting Replicator to Start Up on System Boot
Subversion MultiSite 3.7 or higher comes with a sample script svnreplicator-init.d-sample which can be found in the svn-replicator/bin directory.
A copy of the script, written for Red Hat Linux, is provided here:
#!/bin/bash
#
# chkconfig: - 91 35
# description: Red Hat Linux dist compatible init.d script
#              for starting/stoppping WANdisco svnreplicator daemon
#
# Copyright (c) 2006-2016 WANdisco,Inc. Pleasanton,CA,USA
# All rights reserved.
#
# Author: WANdisco Support Staff
#
# To setup boot time start :  chkconfig --level 345 svnreplicator  on|off
#                                     chkconfig --list svnreplicator

############################################################
# MODIFY THE FOLLOWING VARIBLES TO MATCH YOUR ENVIRONMENT
WD_USER="scm"
WD_INSTALL_DIR="/home/${WD_USER}/svn-replicator"
export JAVA_HOME="/opt/java/default"
#
############################################################

# Source function library.
. /etc/init.d/functions

WD_AGENT_NAME="svnreplicator"
WD_DISPLAY_NAME="WANdisco Subversion Replicator daemon"
WD_AGENT_BIN="${WD_INSTALL_DIR}/bin/${WD_AGENT_NAME}"
WD_AGENT_CONF="${WD_INSTALL_DIR}/config/prefs.xml"

# maximum number of file descriptors
MAXFDS="65000"
pidfile="my.pid"


checkconfig() {
	if [ ! -x ${WD_AGENT_BIN} ]; then
		failure "No ${WD_AGENT_BIN} present"
	fi
	prog=${WD_DISPLAY_NAME}
}

start() {
    checkconfig
    echo -n "Starting $prog:"
	# don't produce core files
    ulimit -S -c 0 >/dev/null 2>&1
	# set maximum number of file descriptors
    ulimit  -n ${MAXFDS} >/dev/null 2>&1
    RETVAL=0
    runuser ${WD_USER} -c "${WD_AGENT_BIN}" >/dev/null 2>&1
    RETVAL=$?

    [ "$RETVAL" -eq 0 ] && success "$WD_AGENT_NAME startup" || \
        failure "$WD_AGENT_NAME start"
    echo
    [ "$RETVAL" -eq 0 ] && touch /var/lock/subsys/$WD_AGENT_NAME
}


stop() {
     checkconfig || return 1
     echo -n "Shutting down $prog:"
     runuser ${WD_USER} -c "${WD_INSTALL_DIR}/bin/shutdown" >/dev/null 2>&1
     RETVAL=$?
     [ "$RETVAL" -eq 0 ] && success "$WD_AGENT_NAME shutdown" || \
        failure "$WD_AGENT_NAME shutdown"
     echo
     [ "$RETVAL" -eq 0 ]  && rm -f /var/lock/subsys/$WD_AGENT_NAME
}

case "$1" in
  start)
	start
	;;
  stop)
	stop
	;;
  status)
	status ${WD_AGENT_BIN}
	RETVAL=$?
	;;
  restart|reload)
	stop
	sleep 3
	start
	;;
  condrestart)
	if [ -f /var/lock/subsys/$WD_AGENT_NAME ]; then
	    stop
	    sleep 3
	    start
	fi
	;;
  *)
	echo $"Usage: $0 {start|stop|status|restart|condrestart}"
	exit 1
esac
2.2 Setting up the Replicator as a Windows service
2.2.1 Set up replicator as a Windows service
We offer a Perl plugin that lets you run MultiSite or Access Control as a Windows service, through the Windows Service Control Manager.
Requirements
- You need a Windows login account with a valid password.
- ActivePerl 5.8 (32-bit) is required.
Important! The 32-bit version must be used, even if you're running 64-bit Windows.
The plug-in is included with MultiSite, or can be downloaded from our site - Windows service installer perl plugin. - If using Windows with User Access Control(UAC) you must run the command prompt as admin.
Setting up MultiSite as a Windows service
Follow these steps on all the nodes where you want to run your WANdisco product as a Windows service.
1. Save the Windows service installer plugin here: svn-replicator\bin\winservice.pl
2. Install the Perl module for Windows Services. At the command line, type:
ppm install http://www.roth.net/perl/packages/win32-daemon.ppd
3. Install the Windows service. At the command line, in the svn-replicator\bin directory, type:
winservice.pl -install
(Type winservice.pl to see all parameters for the command.)
4. (Optional) Change the password for the service.
-
a) Go to the Services window ( > Control Panel > Administrative Tools > Services).
b) Double click on SVN MultiSite.
c) At the Log On tab, change the password and confirm it. Click OK.
5. To add email service for the WANdisco watchdog:
-
a) Stop Subversion MultiSite.
b) Edit the
winservice.pl script.Uncomment (remove the hash #) from the start of the the email line:
#$NOTIFY_EMAIL = 'admin@company.com';Replace
admin@company.com with the email address you would like alert emails to be sent to.c) Restart Subversion MultiSite.
Logs
The service creates a winservice.log, located in the svn-replicator\logs directory.
2.3 Changing the Quorum Type
To change the quorum type, you need to create a new replication group and specify the new quorum then. See Creating a New Replication Group.
2.4 About Watchdog Mode
By default, MultiSite starts in watchdog mode. Whenever the replicator goes down, the watchdog mode restarts it. In watchdog mode, the replication process automatically disassociates from the terminal and becomes a daemon process, so you should not try running it in the background (with &).
Watchdog mode is not supported in Windows, but it is in Windows Cygwin.
You can turn off watchdog by typing:
-nowdog
If MultiSite is unable to start up, for example if it terminates several times in quick secession, watchdog starts the the node in read-only mode.
$ ./bin/svnreplicator -h
Usage:
svnreplicator [-v] [-verbose] [-nowdog] [-pause time] [-email email-address]
- -v
- Print the svnreplicator version
- -verboseVerbose
- console messages go to STDOUT/STDERR instead of logs/console.txt
- -nowdogTurn off
- watchdog mode. WANdisco will not restart automatically if it terminates. Use this option for testing.
- -pauseTime
- in seconds that the watchdog pauses for, before restarting service. Defaults to 0 seconds.
- -emailSpecify
- an email address to send an alert to, whenever the Watchdog restarts or shuts down WANdisco. WANdisco generates an email per local replicator activity. If the email settings were not set up during installation, see Email Settings, described in Using the Admin Console.
Use the -email option to generate email alerts whenever MultiSite restarts. For instance:
$ svn-replicator/bin/svnreplicator -pause 5 -email "admin@blueandgold.com, scmuser@blueandgold.com"
In order to have the replicator automatically started on system reboots, see Setting Replicator to Start Up on System Boot.
2.5 Temporary Files
During the normal course of running the replicator, temporary files are generated. These have the prefix svn-proposal-{GUID}_{seqnum}. By default, they are written to svn-replicator/systemdb/ directory. This can be over-ridden using the prefs.xml file as following:
<DirPrefixMap>
  <fp->/home/svn/replicator/tmp/dir</fp->
</DirPrefixMap>
MultiSite periodically garbage-collects these files at a configurable interval. For more details see the Distributed Agreement Engine Administration Guide.
WARNING:
Do not manually remove these files.
3 Troubleshooting
3.1 How Do I Get WANdisco Support?
Before opening a case, always search the Knowledge base on http://www.support.wandisco.com.
If you want to open a ticket, you can do so at that URL.
3.1.1 How Do I Run the Talkback Script?
WANdisco uses a talkback agent to capture log information for use in problem investigation. Whenever you report a problem to WANdisco support, you should run talkback and attach the resulting output file.
Talkback provides the last 15 WANdisco logs, you can specify a different number of previous logs, or specify a number of logs by date range instead.
1. Go to the bin folder in the WANdisco directory. In Windows, type:
talkbackor in Unix, type:
perl talkback
The talkback agent will capture relevant configuration and log files to help WANdisco diagnose the problem you may be encountering.

Starting the talkback script
2. You'll be asked to confirm whether the repository is located on the same server as the WANdisco product, this is because some information is gathered from the repository. Enter Y (yes) or N (no).
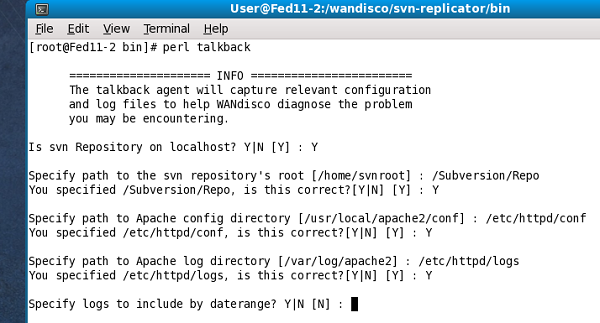
Required log information
3. You'll need to enter the paths to your Apache config and logs directories, confirming each entry with a Y (yes).
4. Next, you'll be asked if you'd like to include logs from a date range. Enter Y (yes) or N (no). If you select yes, you'll be prompted for a start and end date. If you select no, you'll be asked to specify the number of previous logs, you can either enter a number or press return, which will use the set the number of logs to include as 15.

Required log information
When talkback is finished, it will indicate where its output tarball has been saved.
Talkback logs
This is a list of files that you may find in the Talkback file, and what they do. Note that Windows users will not see all of these files, a few of them are Linux/Unix specific.
- .privileges.xml
- Lists the privileges(sic) assigned to the default user roles.
- console.txt
- Logs console events that occur before the replicator starts up, at which point logs are written to the SNVProxyServer-prefs log file.
- file-max
- Stores the maximum number of file-handles that the Linux kernel will allocate.
- file-nr
- Stores three values that denoted the number of allocated file handles, the number of allocated but unused file handles, and the maximum number of file handles. Linux 2.6 always reports 0 as the number of free file handles - this is not an error, it just means that the number of allocated file handles exactly matches the number of used file handles.
- license.key
- The license key file that stores encrypted information about your WANdisco product license.
- limits.conf
- Configuration file for the Pluggable Authentication Module limits , used to control the system resources used by sessions.
- log.properties
- Configurable logging settings.
- messages
- An output file from the systeme log (syslog on Linux). This provides details of the node's environment.
- passwd
- The Subversion password file.
- rep-status
- A detailed log that records the status of Subversion repositories. Note that JAVA installation logs can sometimes show errors, if JAVA was installed somewhere other than the default location.
- reset.log
- A log that records when the reset script has been run.
- services
- Lists the servers available network services.
- svnokerr.catalog
- A list of error numbers and messages that we match on to decide if it is fatal or aceptable.
- SNVProxyServer-prefs.log.0
- The WANdisco replicator log file.
- svnserver.conf
- Repository configuration file for svnserve.
- sysctl.conf
- sysctl.conf contains values to be read and set by sysctl, which is used to modify kernel parameters at runtime.
Do not email the talkback files, only attach them via the web case interface.
The zip file is located at the root directory. Do not email the .zip file, just attach them to your case. Read our Knowledgebase article about How to raise a support case.
3.2 General Subversion MultiSite
3.2.1 Connection Request Timeout Messages
Sometimes in the WANdisco logs, you see connection request timeout information messages logged. These are informational messages and should be ignored unless it is guaranteed that the connection can be established in xxx milli-seconds and happens often.
In normal operation of MultiSite, two connections are established between each of the replicated machines, MultiSite connection and a DFTP connection. These two connections were established when MultiSite started and are used when required. A keep-alive signal is periodically sent on the WANdisco port. There is no traffic on DFTP until a file transfer begins.
Some lesser routers in the path of the two end points will close an established connection if there is no traffic on the connection without notifying the end points. When end points sent data on this stale connection, they hang forever. To deal with these lesser routers, MultiSite does not keep the DFTP open in its connection pool forever. MultiSite establishes a DFTP connection from receiver to sender when a file transfer was required. This solved the problem dealing with lesser routers.
Some companies have a corporate policy that network connections can only be established in one direction. To deal with this scenario, the replicated machines establish a DFTP connection to other nodes periodically and tear them down if there is no traffic within a known interval. Once a connection is established, any side is free to use the connection regardless of which side initiated the connection. A connection in use is never torn down until it is available as a free connection. This is the current implementation.
It takes between 300 to 400 milli-seconds to establish a network connection even on a slow WAN. By default, MultiSite waits for 500 milli-seconds before giving up that a connection cannot be established to a peer machine and prints this informational message. What if the establishments of connection always take 501 milli-seconds. In this case, a connection is never established. To solve this problem, the timeout value is adjusted in 10% increments of the last timeout, starting at 500 milli-seconds, to a maximum of 10 seconds for each timed out connection.
Upon establishment of a successful connection, this timeout value is used for subsequent connection establishment unless an adjustment is required for failed attempts.
3.2.2 VPN, NAT, Firewall Timeouts
This section is useful if you are experiencing issues with slow commits on the non-distinguished node or if you have port-forwarding in your environment.
In a multi-site configuration, most nodes are connected through a WAN. Often, VPN and NAT devices are used to do IP translation and port forwarding. These devices need to maintain state in order to do the port forwarding on-the-fly. This state can grow if not cleaned out. Many devices simply reset the internal state after an inactivity timeout. For example, some Cisco NAT routers reset state after 7200 seconds or 2 hours.
The MultiSite replicator uses persistent TCP connections between the replicators. If these TCP connection are going through a NAT or port forwarding device, it's important to tune the VPN and/or the TCP stack at the replicator host machine. Many NAT devices have buggy implementation that resets the internal state without resetting the TCP connections.
In such a situation, the replicators may see a connection as established but no communication actually happens. The symptoms include a slow commit that is blocking WAN communication. You can run netstat -a | grep <DConEPort> to see if the TCP send queues are backing up. That, in conjunction with slow commits that appear to be hanging, or frozen, typically indicates the NAT is not gracefully resetting TCP connections.
You can further confirm this by using tcpdump or ethereal to check for excessive retransmissions on the DConENet connections. You could also look at your VPN/NAT device log to see if it reset any DConENet connections that appear to be in an ESTABLISHED state via the netstat -a command.
These are a few ways of addressing the issue :
- Specify a connection keepalive timeout in the prefs.xml file as:
<DConENet>
 <ConnectionKeepAliveTime>1800000</ConnectionKeepAliveTime>
</DConENet>
- This causes inactive connections to be closed and refreshed periodically (after 1800K millis or 30 minutes).
- Increase the keep-alive timeout on the NAT/Port forwarding device. If possible, have the DConENet connections never expire. Some devices let you set port specific QoS.
- On the replicator host, tune the TCP stack to have a smaller fuse on the TCP keep alive timer. For example, on Linux, you can specify a value like 1800 (seconds) in
/proc/sys/net/ipv4/tcp_keepalive_timeto reduce the interval from default 2 hours to 30 minutes. - You can restart the Subversion replicator to kick out seemingly established connections but broken by NAT internal resets.
3.2.3 A node is in read-only mode
- 1. Go to the Dashboard. You see the Problem Transactions listed for each node.
- 2. Click on the Problem Transactions link. The System tab displays a message, noting the bypassable transactions and the non-bypassable transactions.
- 3. If there are no bypassable transactions, and you do not know why, see How Do I Get WANdisco Support?
- If there are bypassable transactions, there may be one or several. Click on each transaction.
- 4. Read the message that returns, which will confirm bypassed transactions.
- 5. Verify that the Dashboard does not report any nodes in read-only mode.
If any nodes are in read-only mode,
3.3 Error messages
3.3.1 Missing License Key file
Subversion MultiSite depends on a license key file being present in the svn-replicator/config directory for each node. Please get a valid license from WANdisco and copy the file to the config directory. MultiSite won't start without the license file.
3.3.2 I'm getting a severe exception
I'm getting a SEVERE exception, and replicator is aborting the Subversion transaction and shutting down.
If you get a message in the logs/SVNProxy*.log file similar to
svn: Commit failed (details follow):

svn: File not found: transaction '10-d', path '/development/Hello.txt'
it means the replicator has detected an out of sync condition. Remember, the replicator continuously monitors your repository for any out of sync issues. If it detects this has occurred, it triggers an automatic shutdown to prevent further corruption.
This could happen if someone accidently committed directly to Subversion, bypassing the replicator, and ramped up the version in one node without giving the replicator any chance of replicating. This can be easily resolved by following the reset procedure outlined in I Directly Committed to Subversion, How Do I Rsync?.
Follow all precaution to avoid bypassing the replicator:
- 1. Ensure only svnreplicator host/IP address is allowed to connect to the Subversion server.
- 2. Protect direct logins in Subversion replicator or Subversion server box from end user.
3.3.3 Compressed Stream Invalid
If you get an error message similar to
nchang:tools$ svn commit
> svn: Commit failed (details follow):
> svn: At least one property change failed; repository is unchanged
> svn: PROPPATCH of
> '/repo/!svn/wbl/2d0e7cef-62f8-40a0-bcbd-a3a03a8c59ae/10809':
> Compressed stream invalid (http://100.143.136.110)
Verify that you are not using the Apache mod_deflate option, which is not supported.
3.3.4 Java consistency check on relicator restart
Running nodes with differing environments could lead to inconsistencies in replication. We therefore specify that all nodes should run the same version of Java (JDK)
When each replicator is restarted, it does a Java (JDK) version consistency check against the other nodes in the replication group(s). If it finds that any other nodes are using a different version of Java, it will flag the mismatch and inform the other nodes. The distinguished node will send an email alerting the administrator to the mismatch. Mismatches are also flagged on the admin console's dashboard.
When mismatches are found, no judgement is made as to which version is correct, the replicator only reports that nodes in the replication group are not all running the same JDK version.
3.4 Oops!
3.4.1 I Directly Committed to Subversion, How Do I Rsync?
If you bypassed the replicator, you can reset the replicator state with these steps:
- 1. Shut down all replicators.
- 2.Reset each replicator: at
svn-replicator/bin, type - 3. If this happened on a production repository, you must re-sync all the repositories to the same state/data.
If this happened during an initial setup/evaluation stage, delete the old project in Subversion and create a new one. - 4. Restart all the replicators.
perl reset
It is very important that you take all precautions to avoid directly checking in or committing to the backend Subversion repository.
3.4.2 I Pressed Ctrl-C During a Subversion Command
If you were executing a read command (a command that does not modify the Subversion repository), you do not have to do anything.
If you were executing a write command, update your sandbox after the replicator has applied the command to the repository.
In addition, if you were adding files to the repository (either svn import or svn add, followed by svn commit), wait until you update your sandbox before you continue to use it.
4. Frequently Asked Questions
4.1 Why Are So Many Java Processes Running?
On older versions of Linux, every thread is listed as a process by the ps command. This does not affect the operation of MultiSite. WANdisco does not support the older versions of Linux.
4.2 Can I Store Logs or Content on NFS?
NFS (Network File System) allows files and directories to be accessed remotely over a network using NFS clients. NFS clients are typically built into the operation system kernel these days. However, some operations, like renaming a file, are not guaranteed to be atomic over NFS. Here is a snippet from the rename function's man page on Linux, for example:
BUGS
On NFS filesystems, you can not assume that if the operation failed the file was not renamed. If the server does the rename operation and then crashes, the retransmitted RPC which will be processed when the server is up again causes a failure. The application is expected to deal with this. See link(2) for a similar problem.
Code management systems such as Subversion make heavy use of the rename operation to modify the underlying databases. Independent of WANdisco, it is a risky practice to store Subversion database content on NFS. The code management community at large recommends not using NFS for storing repositories.
WANdisco MultiSite is bundled with a built-in transactional journal and an object database. These are by default stored in the svn-replicator/systemdb and svn-replicator/config directories. These directories should not be mounted on an NFS drive. The replicator itself may be installed on an NFS drive but the systemdb and config directories should be on direct storage (non-NFS options like RAID, SCSI, SAN, etc). Replicator's transactional integrity can be compromised if writes to an NFS server are lost due to a potential NFS client cache crash after the NFS server has indicated IO completion.
4.3 Why is Installer Configuring IP Addresses as 0.0.0.0?
The address 0.0.0.0 is a special IP address, treated as a wild-card IP address. In other words, on a machine with multiple NICs (Network Interface Cards), it binds to all interfaces. The advantages of using wild-card IP address include:
It avoids binding to a fixed IP address. If the host's IP address changes, (for example, the subnet changes, or the machine is moved to a different location) you don't have to change the wild-card IP in the prefs.xml file to the new IP address.
There is wider bandwidth to TCP clients. Now TCP clients can connect to any NIC, because MultiSite is listening on multiple NICs.
The disadvantage to using the wild-card IP is that it gives coarser access control at the IP address level, as all address are being listened to at the specified port. You can always switch from the wildcard IP address to a fixed, static IP address or a DNS hostname, though for the most part, WANdisco recommends you stick with wild-card addressing.
4.4 Should I Worry About Time Changes or Time Zones?
Time changes have no effect on the operation of MultiSite. Times zones also have no effect: all machines use the standard UTC.
4.5 Does WANdisco Support Dynamic DNS?
Yes, WANdisco supports dynamic DNS, but strongly discourages its use. If a hostname is specified during the setup process, WANdisco requires that it should be able to connect to a valid DNS and resolve the hostname to valid IP address upon startup. If the hostname cannot be resolved to an IP (either by not being able to connect to DNS, or no entry is found at the given hostname), WANdisco dies gracefully. This has never been a problem during production and with static IPs.
However, if dynamic DNS support is required, please modify the prefs.xml file at each node and set UseDynamicDNS to true in DConENet element.
<Preferences>
...
<DConENet>
...
<UseDynamicDNS>true</UseDynamicDNS>
</DConENet>
In addition, the following Java security properties should be set to different Time-to-live (TTL).
networkaddress.cache.ttl
networkaddress.cache.negative.ttl
- networkaddress.cache.ttl
- Indicates the caching policy for successful name lookups from the name service. The value is specified as as integer to indicate the number of seconds to cache the successful lookup. The default setting is to cache for an implementation specific period of time.
A value of -1 indicates "cache forever". - networkaddress.cache.negative.ttl
- (Default value:10) Indicates the caching policy for un-successful name lookups from the name service. The value is specified as as integer to indicate the number of seconds to cache the failure for un-successful lookups.
A value of 0 indicates "never cache". A value of -1 indicates "cache forever".
4.6 Can I Use SSH Tunnel to Navigate a Firewall?
You can use SSH tunnels to test connectivity to a replicator's port through a firewall.
SSH tunnels are not recommended for a production environment.
SSH tunnels are temporarily created using a secure shell. If the shell hangs up for any reason, the tunnel goes away. You don't want the connectivity to a replicator's WAN port to be dependent on a transient shell. We recommend using permanent IPsec tunnels (VPN/NAT devices can help) for navigating firewalls.
4.7 WANdisco Authentication
Authentication is the process of confirming identity, whilst authorization determines whether a user or process has permission to take a particular action.
The Apache usernames and passwords should match at all nodes. The Subversion MultiSite replicator's license manager requires a valid username inside the HTTP authorization header to be passed for all DAV commands, except OPTIONS and PROPFIND. In other words, anonymous access to Apache is not allowed to enforce license requirements, unless you have an unlimited or an evaluation license. With an unlimited or evaluation license, you are not required to register the user. This typically means ensuring a Require valid-user line is specified in the Apache SVN DAV configuration files in the /etc/httpd/conf/httpd.conf and /etc/httpd/conf/conf.d/* directories. When using Basic Authentication, it is the end user or administrator's responsibility to keep Apache authentication databases in sync across all nodes.
4.8 Encryption Around WANdisco Protocol
Details about any ECCN classifications you may have applied for and been granted from US Government for export (due to encryption capabilities in client for DAV over SSL).
The WANdisco Subversion MultiSite distribution does not actually perform any encryption or decryption of the DAV traffic. We rely on Apache to decrypt the SSL traffic and then use a proxypass definition within the Apache configuration to redirect the decrypted request to the WANdisco replicator.
Communication between the WANdisco replicators running at each node/replica does not get encrypted directly by the WANdisco replicator either. Instead, many customers may use something like a persistent VPN connection to communicate the replicator to replicator traffic over an encrypted connection, but our code actually is doing no encryption.
Lastly, the WANdisco replicator simply sits as a proxy on the SVN server itself (the host running Apache + mod_dav) so there is no client component that we provide that would be sending any traffic to the SVN server.
4.9 How Do I Restrict Direct Access to My Repository?
If you would like to prevent users from directly accessing your Subversion repository, use the Subversion Location directive as suggested below. You allow only specific IP addresses to access the repository.
This assumes that WANdisco and Apache server are running on the same machine.
From the example shown in Encryption Around WANdisco Protocol:
<Location /svnrepos>
AllowOverride None
Order allow,deny
Allow from 127.0.0.1
DAV svn
SVNParentPath /tmp/dav
AuthType Basic
AuthName wandisco
AuthUserFile /etc/httpd/conf/htpasswd
Require valid-user
</Location>
4.10 About MultiSite log files
MultiSite uses Java logging. See http://java.sun.com for a discussion on Java logging. Make any changes to the svn-replicator/config/log.properties file.
MultiSite places the log files in svn-replicator/logs. The current file is always SVNProxyServer-prefs.log.0, and the files are rotated out and eventually garbage collected. For rotation schedule, see the svn-replicator/config/log.properties file.
Here is a brief explanation of Java logging. The newest log is always log.0. When that log reaches a specified size (500 KB by default), that log gets renamed to log.1 and a new log.0 is started. The old log.1 becomes log.2, log.2 becomes log.3 and so on. The second newest log is always log.1. WANdisco's Log Viewer displays a drop-down list showing the other logs. As the log file names increment higher, they represent going further back in time.
If you want to change the defaults on the file size before log rotation and how many logs to keep, change these parameters in svn-replicator/config/log.properties:
java.util.logging.FileHandler.limit = 500000
java.util.logging.FileHandler.count = 500
The limit is in bytes and the count is the maximum number of logs to keep. Any changes to log.properties are unique to each node, and are not replicated.
4.11 How do I deal with failover agent failure?
If the failover agent fails, the watchdog script immediately restarts it. If the machine crashes, service is unavailable until the machine is rebooted and the failover agent is restarted.
You could also run the failover agent on a hardware cluster. The Veritas Cluster Server is an example of a commercial solution. See
http://www.symantec.com/.
Linux-HA is an example of an open-source solution. See http://www.linux-ha.org/.
5 Guide to the Admin Console
MultiSite has a browser-based Admin Console for changing settings or viewing system logs.
Connect to the Admin Console through a web browser, using your server's hostname or IP address, along with the administration port (defaults to 6444).
Quicklinks
There are some links available, even if you don't login to the Admin Console.

Proxy Status - Proxy Status Displays the node's status in the tab's main panel.
Transaction Status - Lets you check on the status of individual transactions.
Dashboard - Lists of replicated transactions.
Change User Password - Follow this link to change the password of a User, it's not used for changing the Admin password.

The layout and features available in Admin Console alter depending on your license agreement. So you may not see all the elements described in this guide.
5.1 Security
The security tab handles all user related functionality. If you are using LDAP based authentication, you shouldn't make changes to users using the Admin Console User Administration.
Role Administration
Roles are used to define the permissions available to different kinds of users.5.1.1 Create Role
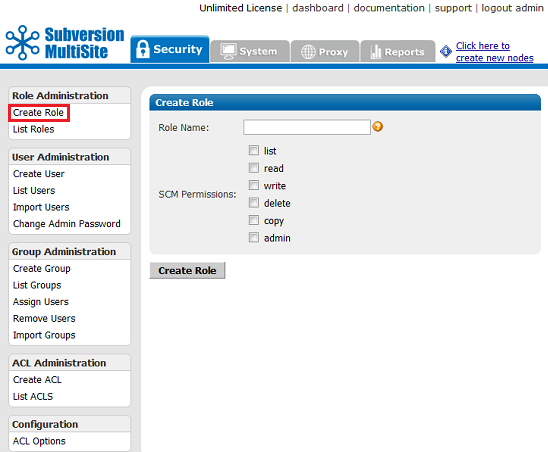
Create Roles Create new roles and assign them privileges. Subversion permissions are: list, read, write, delete, copy, admin.
5.1.2 List Roles

List Roles Display all roles, including pre-defined and any new roles created using the 'Create Roles' screen. Privileges are also displayed. To delete a role, click on the corresponding checkbox and click Delete Selected.
5.2 User Administration
Manage Subversion user accounts.
5.2.1 Create User
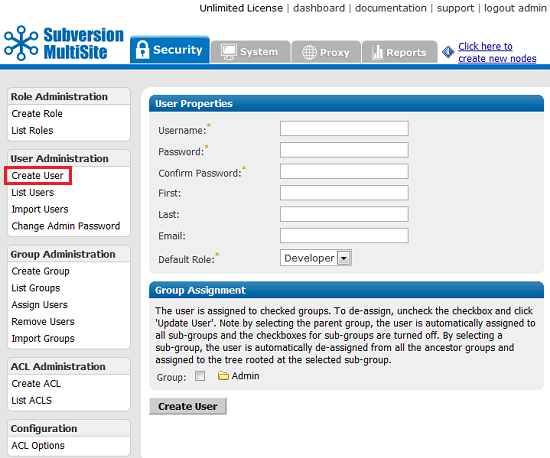
Create User Create any Subversion user.
5.2.2 List Users
List Users This command displays all users.
5.2.3 Import User
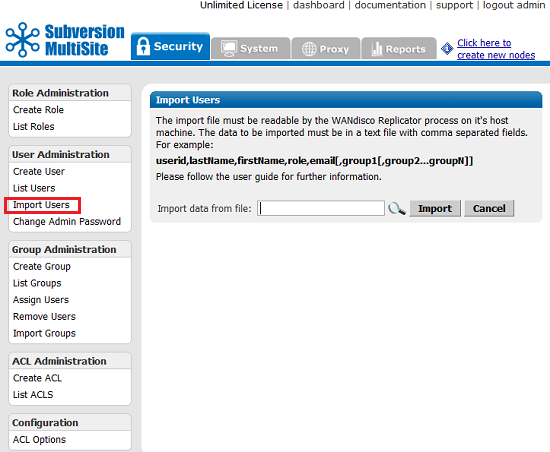
Import Users You can import an existing list of users. The import file must be a comma delimited text file, of the format userid,role,lastname,firstname,email.
Important All files for use with WANdisco MultiSite should use UTF-8 encoding (and/or single-byte encoding if there are no none-ASCII characters). Any other encoding eg. Unicode will not be parsed correctly.
5.2.4 Change Admin Password
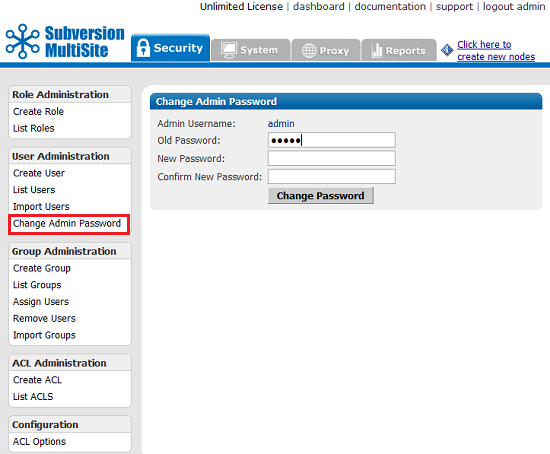
Change Admin Password You can change the Access Control Admin password with this screen.
5.3. Group Administration
Control the groups used for organising Subversion users.
5.3.1 Create Group
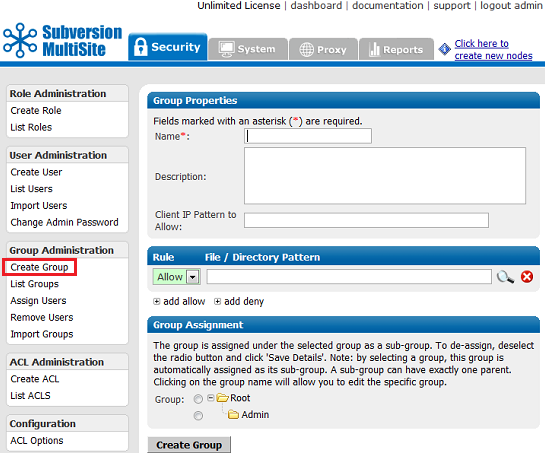
Create Group Create a new group.
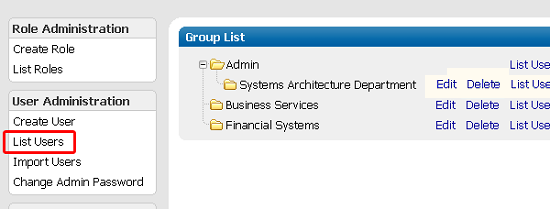
5.3.2 List Groups
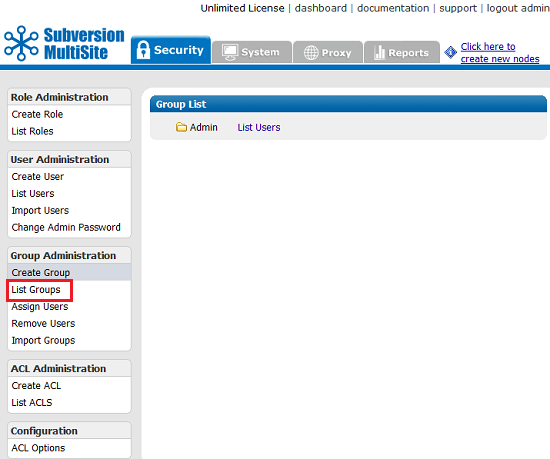
List Group Shows all the groups. You can list all users in each group.
5.3.3 Assign Users
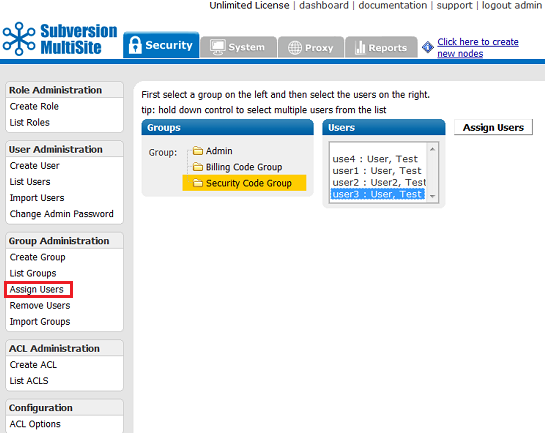
Assign Users Allows you to assign users to groups. If a user is already in a group, his or her name does not appear in the list of available users.
5.3.4 Remove Users
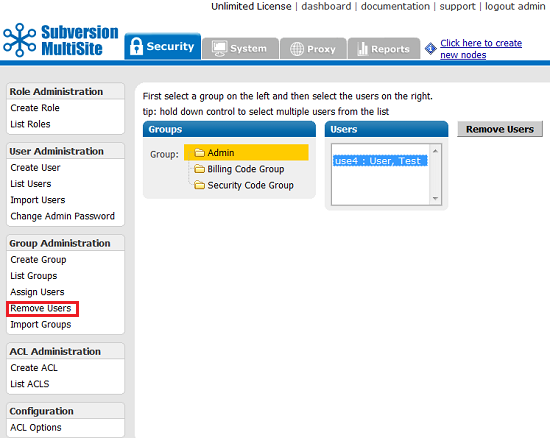
Remove Users Use this to remove users from a group.
5.3.5 Import Groups
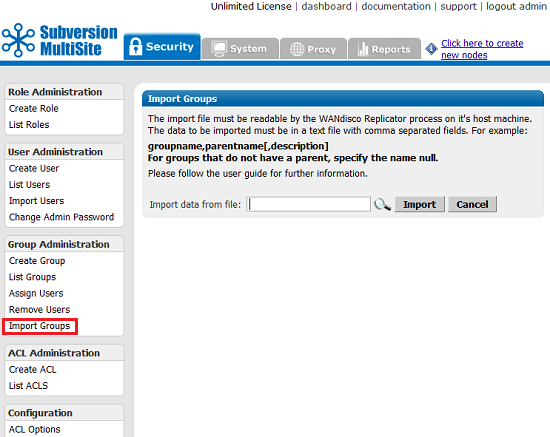
Import Groups You can import a list of existing groups. The import file must be a comma delimited text file, of the format groupname,parentname[,description]. If there is no parent name, specify null.
Important All files for use with WANdisco MultiSite should use UTF-8 encoding (and/or single-byte encoding if there are no none-ASCII characters). Any other encoding eg. Unicode will not be parsed correctly.
5.4 ACL Administration
This menu can be toggled off. See Toggling the ACL Options. For a complete discussion on ACLs, See About Access Control Lists.
5.4.1 Create ACL
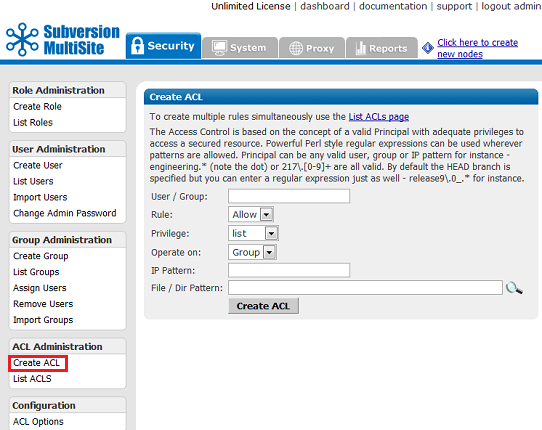
Create ACL Create more than one at a time, use List ACLs.
5.4.2 List ACLs
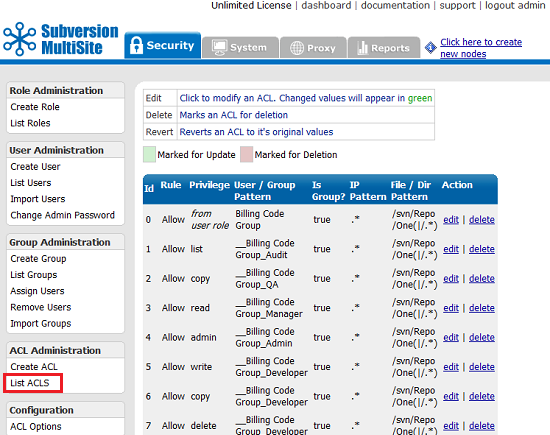
List ACLs Lists all existing ACLs. You can create, edit or delete ACLs with this command. Use this command when creating multiple ACLs.
5.4.3. ACL Options
Used to control the display of Role ACLs and Sibling Groups.
5.5 System
The system tab provides access to logging and backup features.
5.5.1 Log Viewer
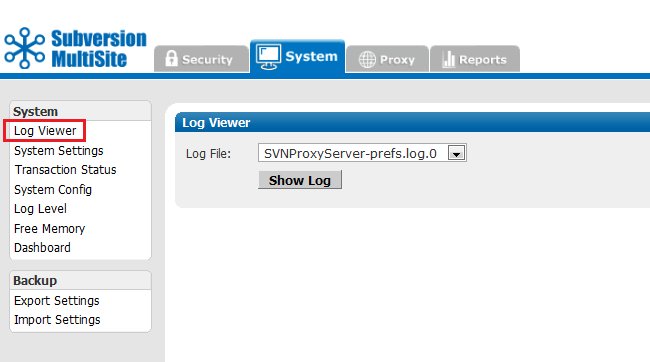
Log Viewer MultiSite log file.
5.5.2 System Settings
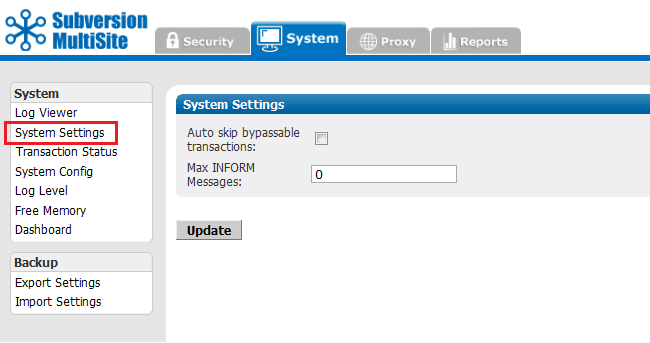
System Settings
Introduced in Subversion MultiSite 3.7 Build 3424 are some advanced settings that can improve performance when certain types of problems occur.
Auto skip bypassable transactions: Tick the box to force the replicator to automatically skip bypassable transactions.
A transaction is bypassable so long as it fails on all nodes within the replication group. In spite of the failure, all repository replicas remain in sync, allowing replication to continue.
Max INFORM Messages:
Default value: 1000,
For Unlimited INFORM Messages use the setting "-1".
This is a an advanced tunable parameter that can limit network notification traffic in situations where a node is pulling in a large number of changes, such as while recovering from a brief network outage.
The default value of 1000 is optimal for the majority of network configurations and file sizes, but can be tuned to make best use of higher or lower bandwidth networks handling varying file sizes.
Once the value is altered at one node, it is replicated to other nodes that are part of the replication group. We recommend that you consult with our support team before changing this setting.
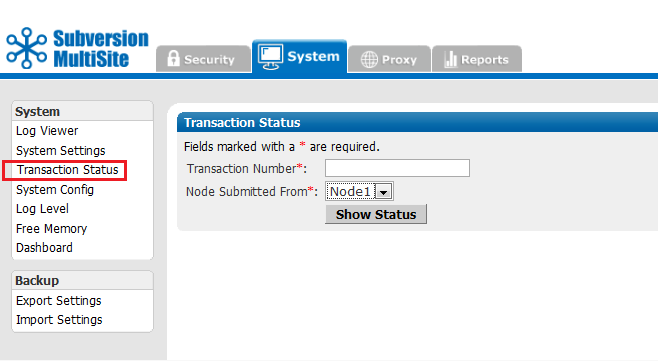
5.5.3 Transaction Status
The Transaction Status page lets you query individual transactions to check on their status.
5.5.4 Log Level
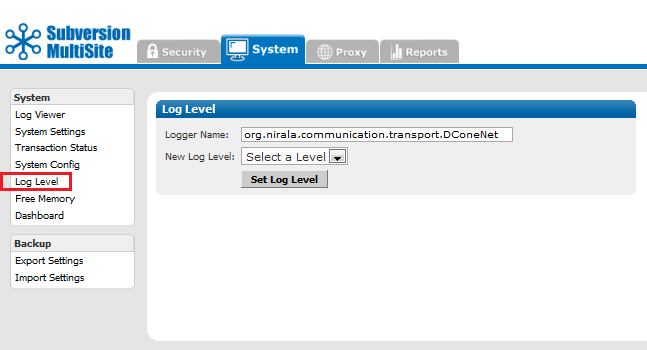
Log Level MultiSite uses one log, and the default level is info. The levels vary from severe, where you get only the most severe warnings, to finest, which logs every action.
5.5.5 Free Memory
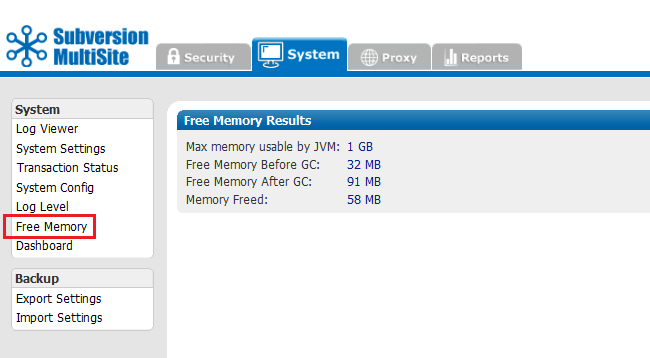
This command frees the memory (GC stands for garbage collection) for the current node. The command occurs when you click on this menu selection. The display shows information on the command that was just performed.
Max mem used by JVM the maximum memory that JVM can use on the current node.
Free memory before GC the amount of free memory before you ran this command
Free memory after GC the amount of free memory after you ran this command
Memory freed the total amount of memory freed at the command's completion
5.5.6 Dashboard
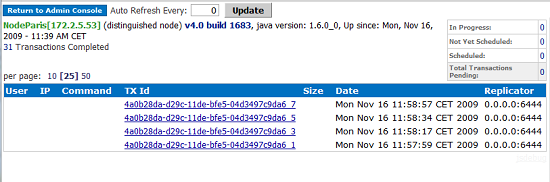
Dashboard provides a list of replicated transactions.
By default, the Dashboard doesn't refresh automatically. Click Update to force a refresh, or set an automatic refresh by enterying a refresh rate, in seconds in the Auto Refresh Every box.
As soon as MultiSite receives a Subversion transaction request, that transaction joins the replication group's queue. There is one queue for the replication group. Pending transactions are not displayed, but are counted in the Total Transactions Pending box in the upper right.
When MultiSite finishes processing a transaction, its displayed in the TX Id field. The Replicator field shows the node from where the transaction originated.
e.g. 0.0.0.0:6444 means the local node originated the transaction.
5.5.7 Export Settings
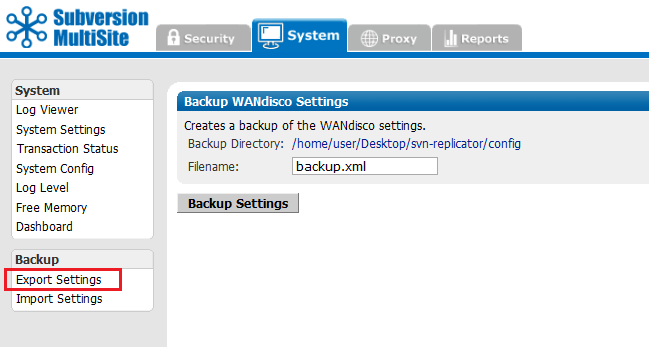
Export Settings Allows you to export settings, including all users, for later importation into a WANdisco product.
5.5.8 Import Settings
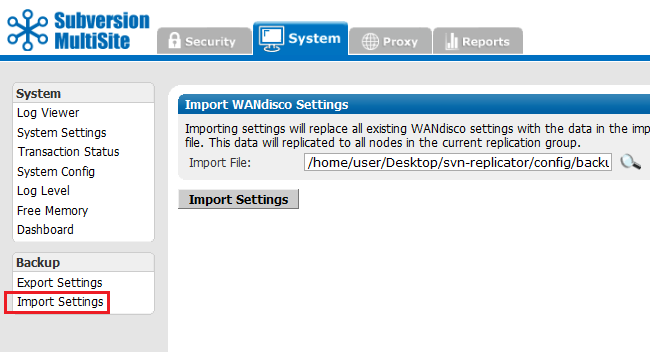
Import Settings Allows you to import settings, including all users.
Important All files for use with WANdisco MultiSite should use UTF-8 encoding (and/or single-byte encoding if there are no none-ASCII characters). Any other encoding eg. Unicode will not be parsed correctly.
5.6 Proxy
The Proxy tab handles proxy settings which alter the way that MultiSite works between Subversion and users.
5.6.1 Proxy Status
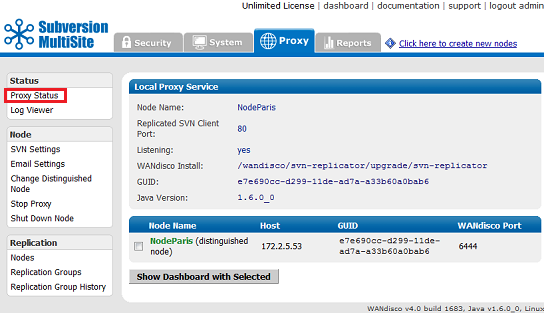
Proxy Status Displays the node's status in the tab's main panel.
5.6.2 Log Viewer
Log Viewer You can view the logs, including the main log SVNProxyServer-prefs.log.0
5.6.3 SVN Settings
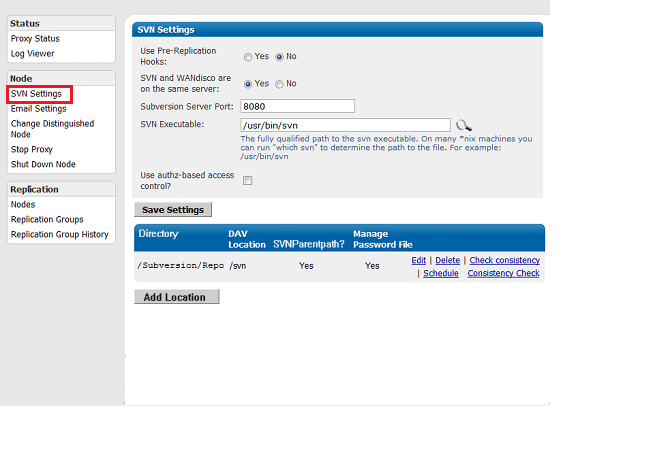
SVN Settings The current values are displayed. You can edit them here.
SVN Settings Use Pre-Replication Hooks: The default is No. If you are using pre-replication hooks, specify Yes.
You MUST select the version of Subversion you are using, otherwise Pre-Replication Hooks will not work. See Setting up hooks
Subversion Server Port: The port MultiSite uses to communicate with Subversion.
SVN Executable: The fully qualified path to the svn executable. Most versions of Unix support a "which svn" to determine the path to the file.
Use authZ-based access control: Tick the check box if you are going to use the Authz module for managing authentication. You'll need to reference your Authz file in the httpd.conf file.
Use LDAP for authentication: Tick the check box to use an LDAP server to manage your users.
Repository Directory and DAV Location
You can Edit, Delete or Check the consistency of the Subversion Repository.
Add Location: Click to add an additional location to the directory in which you are managing repositories.
Edit Repository
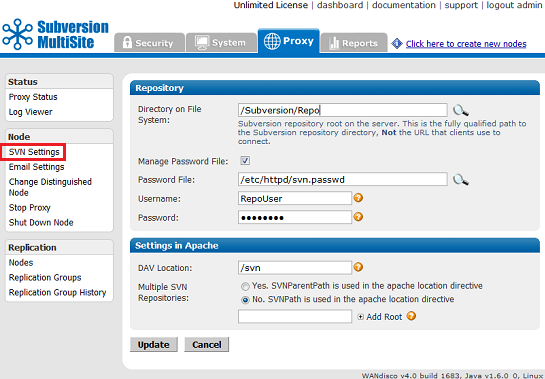
Directory on File System: This is the fully qualified path to the Subversion repository. Not the URL used by clients. You can seach for the location by clicking on the magnifying glass button.
Manage Password File: Tick the checkbox to have MultiSite control your Subversion password file. You can only use this feature if both MuliSite and Subversion are located on the same server.
Username and Password: Username and password of the Subversion user account that will be used to browse the repository. The account will need read and write access to the whole repository.
DAV Location: the directory in which WebDAV is located.
Multiple SVN Repositories: Choose whether you are using SVNParentPath or SVNPath in the Apache location directive.
Consistency Check
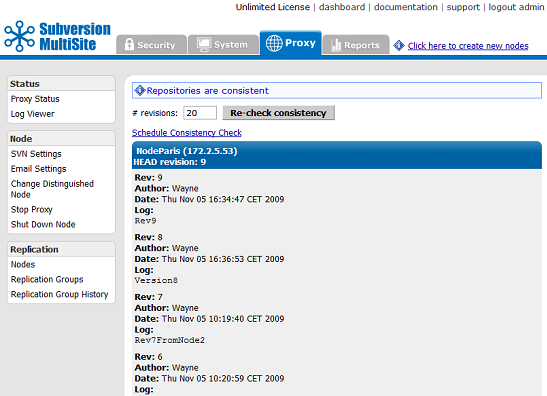
Provides a basic check that replication is working properly by comparing Subversion revision information between nodes. More information about running a Consistency Check
Shedule Consistency Check
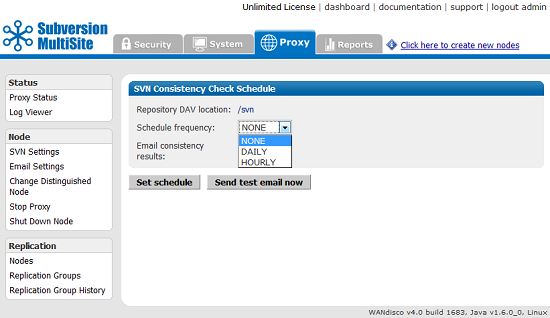
Allows you to set an automatic consistency check once per day or once per hour.
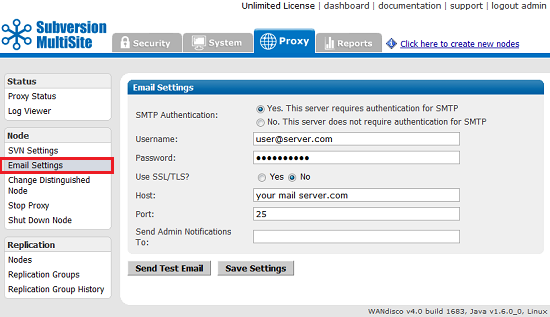
5.6.4 Email Settings
Email Settings Email settings that Access Control uses to send status alerts.
5.6.5 Change Distinguished Node
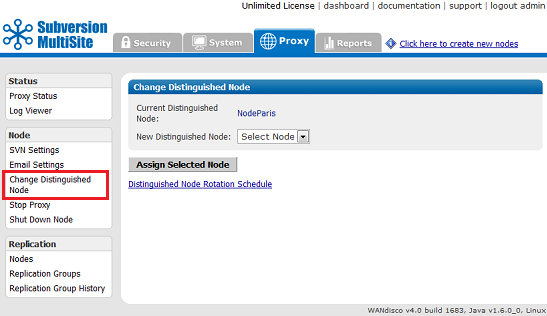
Allows you to change the node in your replication group that holds distinguished status.
Change the distinguished node immediately. Verify with Proxy Status.
If you have a distinguished node rotation schedule in place, the distinguished node is changed immediately, but then the schedule rotates to the next node at the scheduled time of rotation.
5.6.6 Stop Proxy

Stop Proxy Stops MultiSite from and prevents clients from writing to the repository.
5.6.7 Shut down node
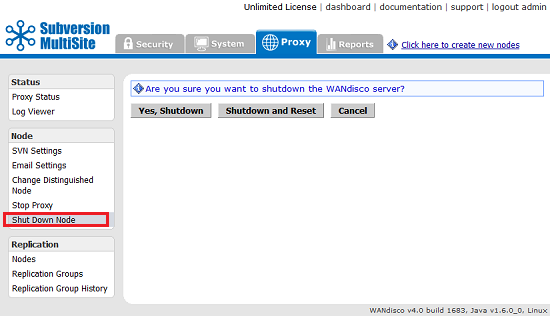
Shut Down Node Shuts down MultiSite completely.
This command shuts down WANdisco at this node.
Restart the node
Go to svn-replicator/bin and type:
perl svnreplicator
Replication
Provides control over node and replication group settings
5.6.8 Nodes
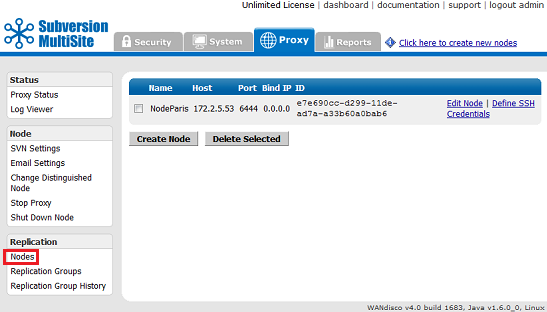
Lists the available nodes. You can edit or create a new node.
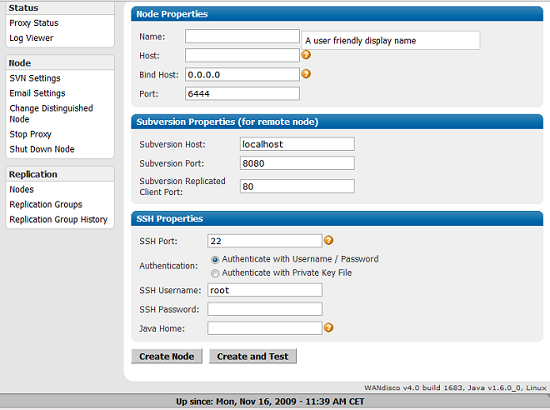
Create / Edit Node
5.6.9 Replication Group
View or create new replication groups.
5.6.10 Replication Group History
A table presents the current and any past active replication group activity.
5.7 Reports
The reports tab gives you acess to various reporting tools for use with the optional Access Control component of MultiSite.
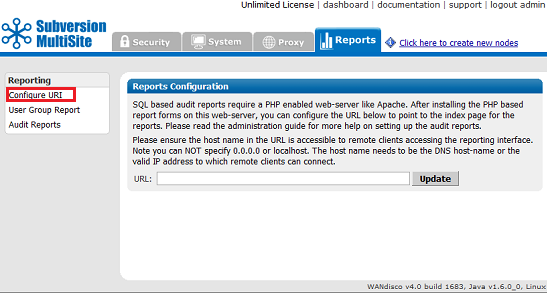
5.7.1 Configure URI
Configure URI If you set up a web-based PHP report form, you enter its address here.
5.7.2 User Group Report
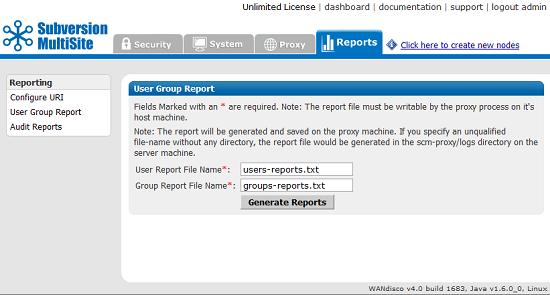
User Group Reports Generate User Group reports and view them with Log Viewer in the System and Proxy tabs.
5.7.3 Audit Reports
Access Control logs any Subversion user access, these logs are controlled through the Audit Reports tab.
Copyright © 2010 WANdisco
All Rights Reserved
This product is protected by copyright and distributed under
licenses restricting copying, distribution and decompilation.