1 Introduction
This pre-deployment guide will help you to ensure that your platform is set up for a trouble-free installation of WANdisco MultiSite.
We'll be using terms like "node" and "replication group" without explaining what we mean. Check out the Glossary for an explanation of these and other WANdisco terms.
For a better understanding about how MultiSite and WANdisco's replication technology works read the Subversion MultiSite Technical Overview.
1.1 Deploy
Setting up Subversion MultiSite calls for some level of expertise in a number of areas. The following task list will help you decide if you need to call in help to get Subversion MultiSite set up:
- Unix or Windows system administration
- Configuring inetd/xinetd on Unix or Cygwin on Windows
- Installing Perl
- Installing Java
- Installing Apache plus server
- Setting up a Subversion repository
If you're not confident about handling any of these tasks, you can request a supported Installation from WANdisco.
A single administrator can manage all the systems running MultiSite, although it's a good idea to have someone at each site who is familar with the MultiSite Basics.
1.2 System requirements
This is a list of the basic hardware and software requirements for a successful setup. See the Pre-installation Checklist for a more detailed list.
Nodes belonging to a replication group require;
- the same operating system
- the same Apache major/minor version, and mod_dav and mod_svn_dav versions
- Java installed (see Installing Java and Perl)
- Perl installed (see Installing Java and Perl)
- have a browser with network access to all servers
- have a dedicated server for the Failover Agent of each High Availability sub group
- have a command line compression utility
- have a copy of the installion and license key files. (These are always sent to you in an email).
Subversion installations must have;
- the same version of Subversion server
- matching file and directory level permissions on repositories
- matching contents in the svnroot directories. Make sure the initial contents are exactly the same, including the repository UUID.
- The Subversion user/passwords on all repository hosts should match.
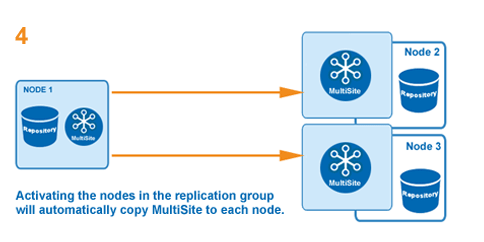
 If possible, run MultiSite and your Subversion repositories on the same server. You'll get the following benefits;
![]() The MultiSite installer can package a copy of the repository when setting up nodes
The MultiSite installer can package a copy of the repository when setting up nodes
![]() The MultiSite can manage the Subversion password file
The MultiSite can manage the Subversion password file
![]() Support for pre-replication hooks.
Support for pre-replication hooks.
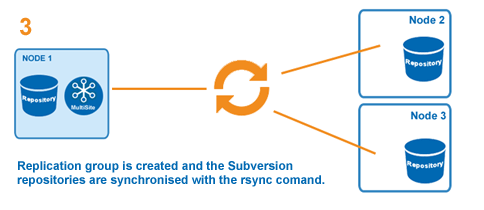
1.3 Setting up identical repositories at all nodes
During setup, all repositories must be identical, with identical file structures.
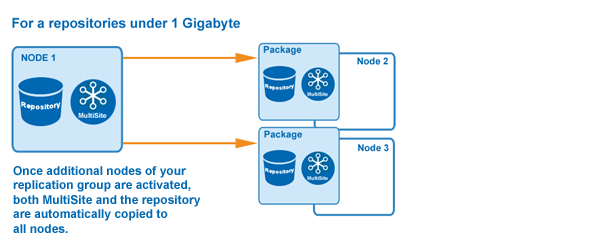
Repositories up to 1GB (Gigabyte) in size:
MultiSite can bundle your repository with the installation package that it uses to setup your additional nodes.
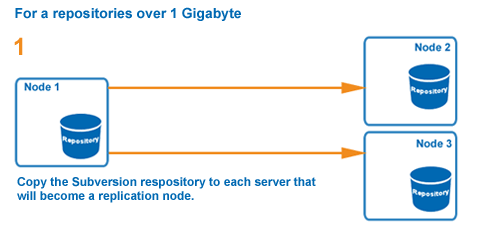
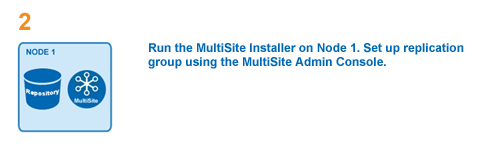
Repositories larger than 1GB in size:
You'll benefit from having your repository already copied to each node, and available when the MultiSite installer runs. This way, at the end of installation you'll be up and running, not waiting for your repositories to copy to all nodes.
If you are copying the repositories manually to the other nodes, double-check that the repository files have the same file ownerships and permissions at all nodes.
1.4 Using two or more repositories
WANdisco supports replication of multiple repositories. Multiple repositories can be configured using multiple SVNPath location directives or with the use of SVNParentPath.
1.4.1 Subversion location directive
Individual subversion repository can be added with the Add Repository command on the SVN Settings page.
  <Location /repo>
    DAV svn
    SVNPath /home/scm/repositories/svn-repo
    AuthType Basic
    AuthName wandisco
    AuthUserFile /home/scm/htpasswd
    Require valid-user  </Location>


  <Location /xyz>
    DAV svn
    SVNPath /home/scm/repositories/xyz
    AuthType Basic
    AuthName wandisco
    AuthUserFile /home/scm/htpasswd
    Require valid-user  </Location>
1.4.2 About Subversion ParentPath
MultiSite uses ParentPath to handle multiple repositories on a node. Here's an example of two replication groups running across three nodes that illustrates the use of ParentPath.
| Replication Group | Nodes |
| US1 | San Ramon San Francisco |
| US2 | San Ramon Sacramento |
Each replication group contains two repositories.
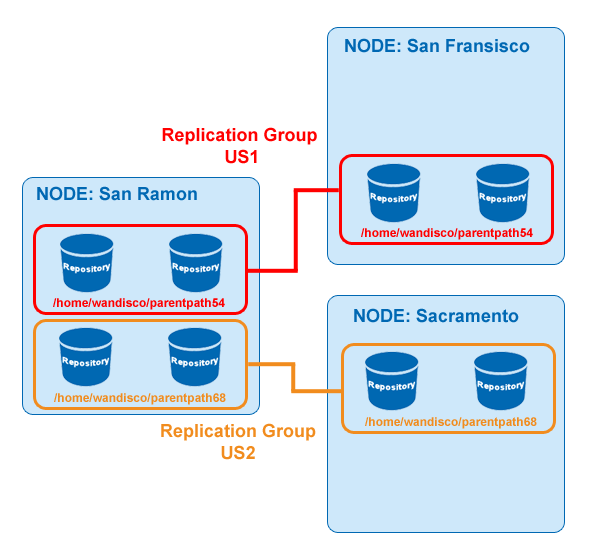
A repository can belong to only one replication group at a time. To use ParentPath, configure mod_dav_svn to use SVNParentPath.
Each replication group has its own ParentPath. For our example, here are the SVNParentPaths.
Apache config for San Francisco Node
<Location /repofirst>
    DAV svn
    SVNParentPath /home/wandisco/parent54
    SVNAutoVersioning on
    AuthType Basic
    AuthName "SVN Repo"
    AuthUserFile /home/wandisco/parent54/dav-auth
    Require valid-user </Location>
Apache config for Sacramento Node
 <Location /reposecond>
    DAV svn
    SVNParentPath /home/wandisco/parent68
    SVNAutoVersioning on
    AuthType Basic
    AuthName "SVN Repo"
    AuthUserFile /home/wandisco/parent68/dav-auth
    Require valid-user
        </Location>
Apache Config for San Ramon Node
<Location /repofirst>
    DAV svn
    SVNParentPath /home/wandisco/parent54
    SVNAutoVersioning on
    AuthType Basic
    AuthName "SVN Repo"
    AuthUserFile /home/wandisco/parent54/dav-auth
    Require valid-user
    </Location>

 <Location /reposecond>
    DAV svn
    SVNParentPath /home/wandisco/parent68
    SVNAutoVersioning on
    AuthType Basic
    AuthName "SVN Repo"
    AuthUserFile /home/wandisco/parent68/dav-auth
    Require valid-user
 </Location>
Subversion Repository Location
Place your Subversion repositories in a location that is not the same as the DAV location directive.
Example:
/home/wandisco/grouprepos/repo1

/home/wandisco/grouprepos/repo2

/home/wandisco/grouprepos/repo3

/home/wandisco/grouprepos/repo4
In our example, all Subversion repositories are stored in the /home/wandisco/grouprepos directory.
Using Symbolic Links
You can create symbolic links from each SVNParentPath to each repository required in that replication group. The links must be created at each node in the replication group.
For example:
Created symlinks for replication group US1, under SVNParentPath in the Location directive.
repo1 (linked to /home/wandisco/grouprepos/repo1)

repo2 (linked to /home/wandisco/grouprepos/repo2)
Created symlinks for replication group US2, under SVNParentPath in the Location directive.
repo3 (linked to /home/wandisco/grouprepos/repo3)

repo4 (linked to /home/wandisco/grouprepos/repo4)
1.5 Using the Authz Module
We recommend using the Apache Authz module in combination with Access Control for a very complete and robust user access control.
To use Authz, create an empty file, svn.authz at your install node. MultiSite will include the file when it creates the package for copying to additional nodes. Also at each node, add the following line to the Location directive in your Apache conf file.
    ###
    # Authz module for authorization configuration
    ###
    AuthzSVNAccessFile /path/to/file/svn.authz
Make sure MultiSite has permission to read and write to the svn.auth file. In the file, create an entry for the admin user at each repository: e.g. for repository mapped to /svn add the following:
 [svn:/]
<admin username> = rw
or for a repo mapped to /myrepo:
[myrepo:/]
<admin username> = rw
where <admin username> is the username that the user enters when adding a repository.
During installation, you are asked if you want to use this module, and the path to its location.
Using blank DAV Locations
It's possible to set the DAV location as blank, i.e.
<Location />
Using a blank DAV location, sets the Subversion server's root as the repository path (instead of using a subdirectory, such as /repo/). It's worth noting that this opens the whole server to external access.
1.6 MultiSite and Subversion password files
All Subversion servers need to have the details of all users across a replication group. The easiest way to keep user details consistant is the allow MultiSite to take control of the Subversion password files, so that any user created in MultiSite is automatically added to Subversion servers across the replication group. In this way, MultiSite's Admin Console makes user administration much easier.
You can choose to have MultiSite control the Subversion password during installation, where you identify the Subversion password file's location. The installer then incorporates it into the replication group. If you have a lot of Subversion users, you can bulk import them into MultiSite.
1.7 Quorum recommendations
This table will help you decide which quorum type is best for your requirements.
| Setup Type | Quorum Recommendation |
| MultiSite | Singleton Response or Majority Response quorum, balancing performance versus availability. |
| MultiSite with High Availability Sub Groups | Majority Response quorum. If you select Singleton Response quorum, the distinguished node represents a single point of failure. |
| Stand-Alone High Availability Group at One Location | Have a group of at least three nodes, which automatically handles the failure of any single replicator node and its subsequent recovery. With a two node group, select Singleton or Majority Response quorum, and the second node must be the distinguished node. |
1.8 Firewalls and virus scanners
You must determine if your replication group sits outside a firewall. Iif any part of your replication group sits outside a firewall, you must configure the firewall so that the port numbers you specify during installation are not blocked or filtered.
If you have a virus scanner running on your network, you must configure it to not filter traffic on the ports you specify during installation.
1.9 Deployment checklist
Though you may have referred to the Deployment Checklist prior to an evaluation of Subversion MultiSite we strongly recommend that you revisit the checklist and confirm that you're system still meets all requirements.
View the Deployment Checklist
1.10 Creating a new Subversion repository?
If you're creating a new Subversion repository, follow the Subversion documentation at http://svnbook.red-bean.com.
1.11 Configuring Apache
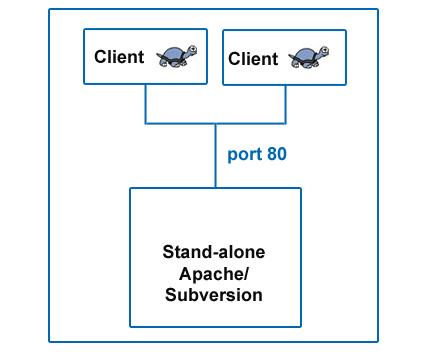
Carefully consider your environment when setting up Apache. You can either dedicate Apache to MultiSite, or share Apache with other locations or applications. MultiSite also supports the use of HTTPS.
Here is an example of a simple configuration without MultiSite.
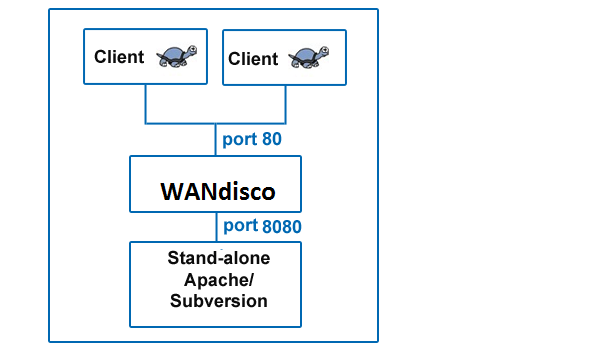
1.11.1 Changing Subversion port (Unix)
You can configure Apache to be dedicated to WANdisco, as shown in the following illustration.
Change the port number in the httpd.conf configuration file in the Apache server. Please see the Listen directive, discussed in the article at http://httpd.apache.org/docs/2.2/bind.html.
Here is a snippet of the httpd.conf file:
#
# Listen: Allows you to bind Apache to specific IP addresses and/or
# ports, instead of the default. See also the <VirtualHost>
# directive.
#
# Change this to Listen on specific IP addresses as shown below to
# prevent Apache from glomming onto all bound IP addresses (0.0.0.0)
#
#Listen 12.34.56.78:80
Listen 8080
With this configuration, Apache server listens on port 8080 instead of default port 80.
1.11.2 Sharing Apache, and Using HTTPS
Alternately, you can configure Apache to use HTTPS, and you can share Apache with other locations or applications, as shown in the following illustration.
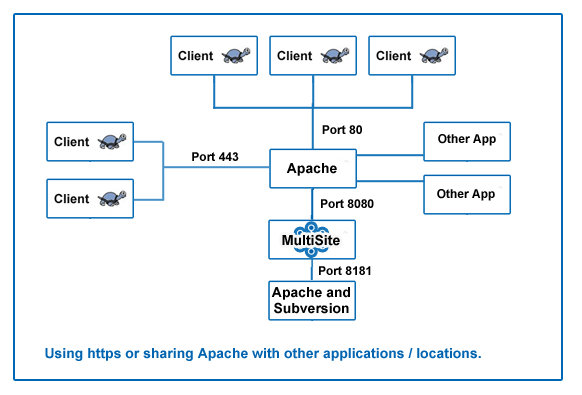
You can use this configuration if you enable a proxy pass.
The following ports are assumed for this example configuration:
- Apache server is running on port 80
- Apache web-dav module is running on port 8181
- WANdisco Subversion replicator is configured to listen on port 8080, and it forwards the requests to apache web-dav module on port 8181
- WANdisco port is listening on port 6444
- Apache SSL is running on port 443 to handle HTTPS requests (if this is set up, the stunnel package is not required)
- All the processes are running on the same machine
- Apache is compiled with mod-proxy and mod-ssl modules
- The Subversion URL is /svnrepos
When you perform the WANdisco installation, specify these ports for each replicator:
- WANdisco port 6444
- Proxy port 8080
- Apache web-dav port 8181 on localhost
In the httpd.conf file, specify the following parameters:
#
# Define apache port and pass anything that matches location /svnrepos to
# WANdisco SVN Replicator
#
NameVirtualHost *:80
<VirtualHost *:80>
ProxyPass /svnrepos http://127.0.0.1:8080/svnrepos
ProxyPassReverse /svnrepos http://127.0.0.1:8080/svnrepos
</VirtualHost>

Listen 8181
NameVirtualHost *:8181

<VirtualHost *:8181>
<Location /svnrepos>
AllowOverride None
Order allow,deny
Allow from 127.0.0.1
DAV svn
SVNParentPath /tmp/dav
AuthType Basic
AuthName wandisco
AuthUserFile /etc/httpd/conf/htpasswd
Require valid-user
</Location>
</VirtualHost>
# For the SSL option
Listen 443
<VirtualHost *:443>
ProxyPass /svnrepos http://127.0.0.1:8080/svnrepos
ProxyPass /!svn http://127.0.0.1:8080/svnrepos/!svn
ProxyPassReverse /svnrepos http://127.0.0.1:8080/svnrepos
ProxyPassReverse /!svn http://127.0.0.1:8080/svnrepos/!svn
SSLEngine on
SSLCertificateFile /etc/httpd/conf/ssl.crt/server.crt
SSLCertificateKeyFile /etc/httpd/conf/ssl.key/server.key
SSLCACertificateFile /etc/httpd/conf/ssl.crt/ca-bundle.crt
</VirtualHost>
1.11.3 Using HTTP with Apache
This section applies to any Apache configuration.
In order to make a Subversion repository function in a distributed environment, Subversion MultiSite requires exactly the same Apache/Subversion setup at all the nodes.
Even without MultiSite, Apache benefits from some tweaks to work effectively with Subversion.
1 Change Apache's connection keep-alive settings to allow long lived HTTP connections. Add this to the Apache configuration file conf/httpd.conf or included conf/extra/httpd-defaults.conf. For instance,
$ vi conf/httpd.conf
...
# Various default settings
Include conf/extra/httpd-default.conf
...
$ vi conf/extra/httpd-default.conf
...
#
# Timeout: The number of seconds before receives and sends time out.
#
Timeout 7200
# KeepAlive: Whether or not to allow persistent connections (more than
# one request per connection).
#
KeepAlive On
# MaxKeepAliveRequests: The maximum number of requests to allow
# during a persistent connection. Set to 0 to allow an unlimited amount.
#
MaxKeepAliveRequests 0
#
# KeepAliveTimeout: Number of seconds to wait for the next request from the
# same client on the same connection.
#
KeepAliveTimeout 14400
...
2. Ensure the SVN DAV settings in Apache's configuration files are exactly the same at all nodes. The top level location URI prefix should be the same.
If you are using ProxyPass, avoid using a Dav Location that is a single '/' (slash). This is not compatible with MultiSite and can cause the replicator to crash.
We recommend copying the current conf file, and then changing the host:port settings. For instance, here is a conf file snippet with Apache virtual hosts (you do not have to use Apache virtual hosts, this is only an illustration):
# Site A
$ cat conf/extra/httpd-svn-dav.conf
...
NameVirtualHost site-a:8181
<VirtualHost site-a:8181>
<Location /dir0>
DAV svn
SVNPath /home/site-a/svnroot
AuthType Basic
AuthName wandisco
AuthUserFile /home/site-a/apache2/dist/conf/htpasswd
Require valid-user
</Location>
</VirtualHost>
...
# Site B
$ cat conf/extra/httpd-svn-dav.conf
...
NameVirtualHost site-b:9191
<VirtualHost site-b:9191>
<Location /dir0>
DAV svn
SVNPath /home/site-b/svnroot
AuthType Basic
AuthName wandisco
AuthUserFile /home/site-b/apache2/dist/conf/htpasswd
Require valid-user
</Location>
</VirtualHost>
...
3. The Apache user names and passwords should match at all nodes. Subversion MultiSite requires a valid username inside the HTTP authorization header to be passed for all DAV commands.
1.11.4 Apache and SVNKit
There are potential problems with connection pooling when using Apache and SVNKit. Adding Subversion MultiSite to the mix doesn't change these issues, though you may need to revisit them after installing MultiSite.
WANdisco recommends using JavaHL with Eclipse IDE, which does not use connection pooling, and thereby eliminates any problems.
1.11.4.1 SVNKit and Connection Pooling
SVNKit uses connection pooling. For a given client, SVNKit opens two connections and keeps them open for later use. On a system with a heavy load this can hit performance. An open connection consumes an Apache worker thread, with lots of clients and pooling going on, Apache may run out.
Apache provides some tuning parameters to optimize connection pooling, while still releasing unused connections. The tunable parameters are Timeout, KeepAliveTimeout, MaxKeepAliveRequests, and KeepAlive. For more details refer to the Apache configuration documentation.
1.11.4.2 Optimize Your Configuration
Apache has two timeout configurations: Timeout and KeepAliveTimeout. In general, the Timeout value should be lower than the value for KeepAliveTimeout.
Setting KeepAlive to false is not recommended. If you set KeepAlive to false, a client's transactions create an enormous overhead establishing and destroying connection.
1.11.5 Apache 2.2/SVN-DAV (Windows)
Follow the standard Subversion documentation for installing Subversion on Windows. Here's a typical setup for Apache 2.2 with svn-dav.
1. Install Apache 2.2.x.
2. Install subversion. Make sure it's Subversion for Apache 2.2.x. For this example assume subversion is installed in c:\Subversion and apache is installed in c:\Apache.
3 Copy c:\Subversion\bin\int13_svn.dll to c:\Apache\bin.
4. Copy c:\Subversion\bin\libdb44.dll to c:\Apache\bin.
5. c:\Subversion\bin\mod_authz_svn.so to c:\Apache\modules.
6. Copy c:\Subversion\bin\mod_dav_svn.so to c:\Apache\modules.
7. Uncomment these lines in apache/conf/httpd.conf:
LoadModule dav_module modules/mod_dav.so
LoadModule dav_fs_module modules/mod_dav_fs.so
8. Add these lines to apache/conf/httpd.conf:
LoadModule dav_svn_module modules/mod_dav_svn.so
LoadModule authz_svn_module modules/mod_authz_svn.so
<Location /myDavLocation>
DAV svn
SVNPath C:\repo
SVNAutoversioning on
AuthType Basic
AuthName "SVN Repo"
AuthUserFile C:\repo\dav-auth
Require valid-user
</Location>
9. Check that the users have been added to the C:\repo\dav-auth file. To add new users or change passwords, use apache/bin/htpasswd.exe.
10. Restart Apache.
11. Point a web browser to http://server:port/<Your Dav Location>.
2 Installing Java and Perl
You should have already installed Java and Perl at all the nodes in your replication group for your trial evaluation. Any new node you add to the replication group needs Java and Perl installed as well.
2.1 Installing Java
1.Install JDK 1.6 and define the JAVA_HOME environment variable to point to the directory where the JDK is installed. You can download JDK 1.6. from http://java.sun.com/.
2. Add $JAVA_HOME/bin to the path and ensure that no other java (JDK or JRE) is on the path.
$ which java
/usr/bin/java
$export JAVA_HOME="/usr"
or
$ which java
/export/share/apps/jdk/1.6.0/bin/java
$export JAVA_HOME="/export/share/apps/jdk/1.6.0"
3. Ensure the full JDK is installed, not just the JRE. This can be confirmed by running java -server -version. If it generates a not found error, repeat Steps 1 and 2.
If you find package management problems or conflicts with the JDK version you are downloading (for example, rpm download for Linux), you may want to use the self-extracting download file instead of the rpm (on Linux) package. The self-extracting download easily installs in any directory without any dependency checks.
2.2 Installing Perl
1. On UNIX or Cygwin, install perl version 5.6 or greater and ensure that the perl executable is on the system path.
2. On Windows, install ActivePerl version 5.8 or greater and ensure that the perl executable is on the system path. You can download the MSI installer for ActivePerl
Copyright © 2010 WANdisco
All Rights Reserved
This product is protected by copyright and distributed under licenses restricting copying, distribution and decompilation.