Before you begin
- Ensure that you work with sufficient user permissions.
- Ensure you have the latest version downloaded and extracted to a temporary directory on all nodes.
- Ensure that you have sufficient disk space to create a backup copy of the
svn-replicatordirectory on all nodes - The upgrade process should take about 30 minutes, during which time Subversion will be put in a read-only mode. Remember to tell your Subversion users.
- This process assumes no change have been made to your replication group or nodes. If you are planning on changing your replication group, complete the upgrade first, then make your changes using the admin console.
See Adding nodes to a replication group
1. Upgrade using the upgrader script
Use this procedure if you are upgrading from one build of Version 3.7 to another.
To upgrade from or to a different version, follow the Upgrade from backup.
At one node:
- 1.1 Enter the admin console, click on the Proxy tab and click Stop Proxy.
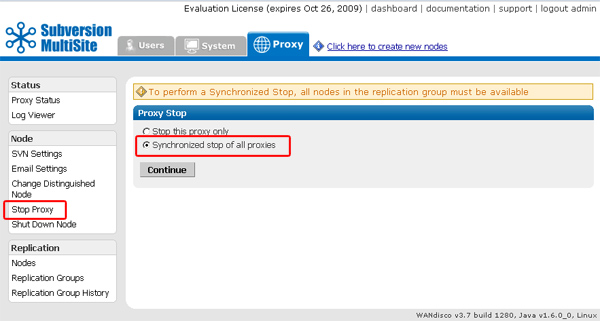
Select Synchronized stop all proxies, then click Continue.
This should ensure that all nodes become read-only, while keeping the repositories in synch. Click on Proxy Status to confirm all nodes have stopped.

- 1.2 Open a terminal session for each of your nodes, making sure you have sufficent permissions.
At/svn-replicator/binrun:./shutdown
- 1.3 At each node, run:
./reset
This will ensure that all nodes are in a clean state when restarted. - 1.4 Back-up your
svn-replicatordirectory. - 1.5 Go to the directory containing your new installation files, eg.
<extracted_upgrade_files>/svn-replicator/libdirectory and run the upgrader script, using the command:java -jar svn-replicator.jar -upgrade <path to your active installation>
e.g. java -jar svn-replicator.jar -upgrade /wandisco/svn-replicator
Read more about using the upgrader script. - 1.6 You'll be prompted to confirm that you've taken all the necessary steps before starting the upgrade:
2) Have you run synchronized stop on replicators at all nodes Y or N ?
3) Have you run reset command from the /bin directory at all nodes? Y or N ?
4) Confirm that you wish to upgrade the installation at: /wandisco/svn-replicator
   If you proceed, files will be overwritten. Y or N ?
Answer "Y" to all prompts. If there's anything you need to complete, open up a new terminal window and complete the requirement before continuing. - 1.7 When the upgrade has been completed at all nodes, restart the replicators. Go to
/svn-replicator/and use the command:
./svnreplicator
- 1.8 You can confirm that your version is updated by checking the line at the bottom of the admin console screen. You've now completed the update of your Subversion MultiSite installation.

At each node:
Using the Upgrader script
You can read more about how to use the upgrader script by running it with the -help flag.
$ java -jar lib/svn-replicator.jar -help
Valid parameters are:
-dprefs show dynamic preferences.
-nodes show node information.
-upgrade <path> upgrade an existing installation at the specified path.
-upgradeNoConfirm <path> upgrade an existing installation at the specified path WITHOUT PROMPTING FOR CONFIRMATION.
-help | -h show help
2. Upgrade using backed-up data
Use this procedure if you are not upgrading from one build of version 3.7 to another. Instead of using the upgrader script you'll back up your data, then upgrade using the setup script. Once the new version of Subversion MultiSite is installed, you'll import your backed-up data.
Stop MultiSite by performing a Synchronized Stop
- If any nodes are unavailable, the Synchronized Stop will suspend until all nodes are available.
- When the Synchronized Stop has completed, Subversion will be read-only.
1.1 Open the Admin Console, on the left-hand menu click Stop Proxy.
2.2 Check that radio button for "Synchronized Stop of all proxies". MultiSite will now wait for any remaining transactions to complete, after which all nodes will stop listening, stopping replication.
2.3 (At All Nodes) Restart MultiSite.
2.4 Back on your install node, refresh the Proxy tab and click Resume.
When the Admin Console has refreshed you'll see the Listening field now shows yes.
3. Backup your settings from the Admin Console
3.1 Open the Admin Console and click on the System tab.
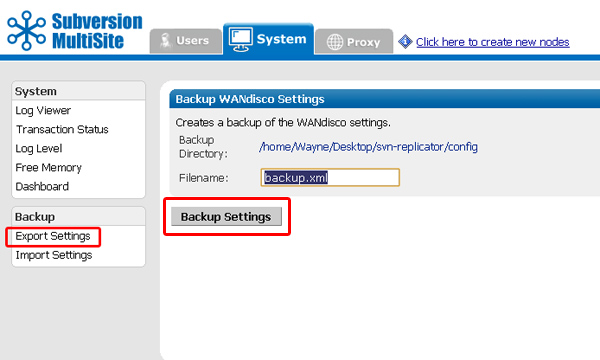
3.2 Click on Export Settings. Confirm the filename and location, then click on Backup Settings. All settings and user data will be exported in the resulting backup xml file.
4. Delete directories that will be recreated during the upgrade
4.1 Copy the svn-replicator to a backup location.
4.2 Back on the install node, create an archive of the config directory, then delete the systemdb.
4.3 In the svn-replicator/config directory, delete the following subdirectories:
membership
security
passwd
5. Extract and run the setup file
5.1 Decompress your new MultiSite archive file.
5.2 Copy the license evaluation key file to the svn-replicator/config directory.
5.3 Go to /svn-replicator/bin/, then start the installation with the following command:
perl setup
Respond to the Yes / No prompt relating to java memory settings.

5.4 The setup will now start up the browser based installer. Open your browser and go to address shown at the end of the setup. This will be the IP of your installation machine, on the WANdisco port (6444 by default).

6.Complete the upgrade through a browser.
6.1 From the Welcome screen, click Continue.

6.2 Once you've read the WANdisco End User License Agreement, click I Agree to continue with the upgrade.

6.3 Enter a password for the default Admin Console account, the username for this account is now admin (for earlier versions it was "root"). Click Next to continue.

6.4 The next two screens explain how MultiSite will act as a proxy between Subversion clients and the Subversion server. Click Next to continue.

6.5 By default, MultiSite will listen on port 80, while Subversion will listen on port 8080. The benefit of this setup is that Subversion end-user don't need to make any changes.

6.6
You'll confirm the proxy settings. These will be populated with the default settings noted in the previous screens.
Node Name: The name that MultiSite will use for this, the first node. The name cannot contain spaces, but can be changed later from the Admin Console.
Node IP: The node's IP.
Bind Host: By default, this uses the wildcard 0.0.0.0 IP that binds to all network interfaces on the node. Read about the benefits of using the wildcard IP
Client Port: By default this is 80, allowing Subversion users to continue without making change to their client setup.
Admin Console Port: 6444 by default. Should you need to use a different port for accessing the Admin Console, restart the setup (step 3.1.3) using the following command:
perl setup <preferred port for Admin Console access>
Once you've finished making any changes to the proxy settings, click Next to continue.

6.7
Setup will check the Apache config file for settings that might cause problems for MultiSite.
If the httpd.conf file isn't found, enter its path into the Configuration File entry box, then click Reload Configuration.
Look out for warning boxes for where setup finds a problem. You'll need to manually edit the httpd.conf file, then click on Reload Configuration to have setup check your changes.
User: Owner of the file.
Group: The group in which the owner belongs.
KeepAlive: Setup will look to see that the Keep-Alive directive is set to On.
KeepAliveRequests: Setup will look for 0, which indicates that no maximum limit will be set for connection requests.
KeepAliveTimeout: Set very high (500,000 seconds) to ensure connections don't timeout.
Listening IP: For a node with multiple IPs, this will indicate the IP used for listening.
Listening Port: The default listening port is 8080.

6.8 Setup now allows you to modify your Subversion settings. Watch for alerts that confirm the port and path that MultiSite will associate with Subversion
SVN Settings
Use Pre-Replication Hooks: Select whether you are using Pre-Replication Hooks.
SVN and WANdisco are on the same server: Confirm if MultiSite and Subversion are running on the same machine, this is a requirement for MultiSite to manage your Subversion password file.
Subversion Server Port: 8080 by default.
SVN Executable:This is the fully qualified path to the Subversion executable. Setup will try to fill this in automatically, otherwise type it into the entry box.
Use authz-based access control Click on the box if you are using Authz access control.
At the bottom of the screen is a table that confirms the DAV Location and password control for your repositories. You can click edit to make changes. You can add additional repositories by clicking Add Repository. To continue setup, click Next.

6.9
You can enter email settings so that MultiSite can send alerts.
SMTP Authentication: If you select No, you'll need to provide your account.
Username and Password in the following entry boxes.
Use SSL/TLS: Choose yes if you wish to send emails over a secure connection.
Host: Enter the address of your mail server.
Port: Enter the SMTP port, 25 by default.
Send Admin Notification To: The email address to where notifications will be sent.
You don't need to provide email settings, in which case, click Skip to continue. Otherwise, click Next.

6.10 You have now completed setup. You can go back and make changes or click Complete installation with these settings to save them and restart MultiSite.

6.11 You will next see a Completing Installation screen, which MultiSite restarts. When completed, you'll see the authentication screen for the Admin Console. Enter the username 'admin' and the password you entered during setup to enter.

7. Import your saved settings from the Admin Console
From the Admin Console, click on the System tab. Click on Import Settings. Enter the path to your backup file (exported in step 2.1) or click on the magnifying glass to browser for the file. Click Import Settings.

You've now completed the upgrade to Subversion MultiSite 3.7
Copyright © 2010 WANdisco
All Rights Reserved
This product is protected by copyright and distributed under
licenses restricting copying, distribution and decompilation.